8.30.2006
The Seamless Hybrid
I know you all are the last people I need to sing praises to about Elizabeth Zimmermann, but will that stop me? You know it won't.
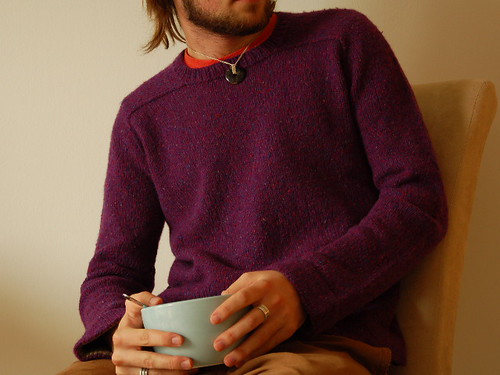
Pattern: Seamless Hybrid by Elizabeth Zimmermann (not so much a pattern as a recipe)
Source: Knitting Without Tears
Materials: Rowan Yorkshire Tweed DK in 'Revel' (1o Balls); Rowanspun DK in 'Rush' (less than 1 ball) for hem facings.
Needles: US 6 Clover Bamboo Circulars (29" & 16"); US 6 Crystal Palace Bamboo DPN's
Cost: $49.99 (scored a bag of Yorkshire Tweed on Ebay) + Shipping
Start Date: 26 July 2006
Completion: 18 August 2006
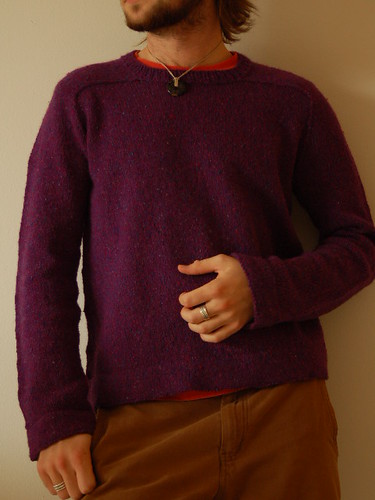
I'll do my best to explain the construction on this one. The (pure) genius lies in the simplicity. Again, I realize I'm preaching to the choir here...
Anatomy: EZ offers up 4 recipes for seamless sweaters in "Kw/oT." With the exception of yoke construction, all 4 sweaters are done in the same way. You knit the body in the round (in my case, a straight tube with no shaping), followed by two sleeves (beginning at the cuff, increasing up to the desired circumference as you approach the armhole). These three pieces are knit seperately until you've reached a preferred length. This part of the sweater was sort of a snooze-fest, but I love me some stockinette in the round, so I enjoyed it. It also goes crazily fast.
When all three pieces are completed, you join each onto one 29"+ circular needle and work one long round to join them all together (having left of 8% body circumference for the underarm on each piece) - this is the longest round you will work. From this point, you choose a yoke treatment and get to the good stuff!
The Seamless Hybrid is a tasty mixture of a standard raglan and a saddle-shoulder pullover. Work the first portion of the yoke with standard raglan decreasing, although, because we're working in the round, we can decrease at a rate of every third row (rather than every second or fourth) which gives the IDEAL raglan slope, and starts securing that wonderful fit. After a certain number of stitches have been decreased, its time to saddle up. From here on out, you will be working just the sleeve stitches back and forth, making a saddle that slowly approaces the center neck, leaving the body stitche s live on the needle. How is it seamless? As you work the saddle, you knit the last stitch of each row TOGETHER WITH ONE LIVE STITCH OF THE BODY. You are seaming up the top of the piece as you build it.(Seriously, I'm excited just explaining it). When you reach the collar - you bind of half of the stitches of the saddle and continue working them across the back. This means the neck hole is merely the front half of the sleeve saddle, in the center of the sweater. When both saddles meet in the middle, you kitchener graft them together and BAM, your sweater is all seamed up. Pop a collar on that bad boy and you're ready-to-wear.
(I realize that this description may be convolluted and confusing (much like the pattern writing!) I had to read and re-read multiple times to envision it correctly. If your having trouble, just make one, it'll all make sense to you then)
Below I have included visuals of the yoke construction (Click on them to see them in greater detail):
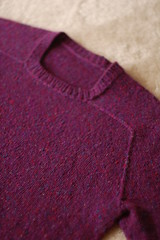
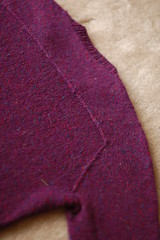
front of yoke :: back of yoke
Modifications/Personalization:
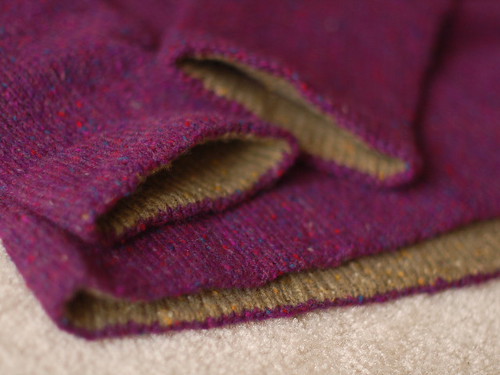
How do you make it your own? Well, first off - any sweater you make from such a general recipe will be indiviudalized based on your yarn choices: guage, drape, shaping, blah blah blah. Its the same old story. I chose to add a wide (about 2") turned hem at the sleeve and body cuffs. I liked how this added a little weight to the bottom half of the piece. It also gave me an opportunity to add a contrasting color on the hem facings.
contrasting hem facings
Recognize it? Thats a little leftover Rowanspun DK from this. I like the semi-off-the-wall color combo, and the union of tweeds. (Is there any better union?)
Some of you asked about how I did this, and its a suuuuper simple process: With contrasting yarn (Rowanspun) provisionally cast-on 90% the number of stitches you plan on having at the base of your sleeve. Knit these stitches to desired cuff length (2"). Knit one round with Main Yarn (Yorkshire Tweed), increasing evenly up to 100% of cuff circumference. Purl one round (this is your turning round). Now begin to knit normally with your Main Yarn. When you have knit the equal length with your Main Yarn that you had previously done with your Contrasting Yarn (2"), it is time to join them together: Fold the hem and begin your round, knitting two stitches together on every stitch (one contrasting yarn stitch, and one main yarn stitch). Keeping with the whole "seamless" theme, we are bypassing the insanely annoying step of sewing down hem facings (cringe). *NOTE: you are knitting together 10% more Main Yarn stitches than Contrast Yarn Stitches... you will need to calculate for this and skip a K2tog every once in a while (you'll only knit the Main Color by itself).
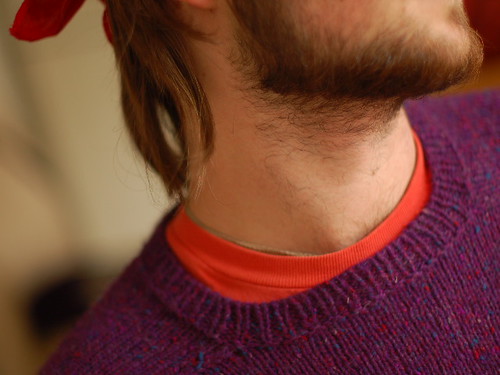
EZ suggested finishing with a hemmed collar as well - which was my original plan. However, when I did this it looked rotten. It really didn't fit. So I went with a 1x1 ribbed collar and a tubular (kitchener) bind off (i love how clean that one is). I like the finished product

Source: Knitting Without Tears
Materials: Rowan Yorkshire Tweed DK in 'Revel' (1o Balls); Rowanspun DK in 'Rush' (less than 1 ball) for hem facings.
Needles: US 6 Clover Bamboo Circulars (29" & 16"); US 6 Crystal Palace Bamboo DPN's
Cost: $49.99 (scored a bag of Yorkshire Tweed on Ebay) + Shipping
Start Date: 26 July 2006
Completion: 18 August 2006

I'll do my best to explain the construction on this one. The (pure) genius lies in the simplicity. Again, I realize I'm preaching to the choir here...
Anatomy: EZ offers up 4 recipes for seamless sweaters in "Kw/oT." With the exception of yoke construction, all 4 sweaters are done in the same way. You knit the body in the round (in my case, a straight tube with no shaping), followed by two sleeves (beginning at the cuff, increasing up to the desired circumference as you approach the armhole). These three pieces are knit seperately until you've reached a preferred length. This part of the sweater was sort of a snooze-fest, but I love me some stockinette in the round, so I enjoyed it. It also goes crazily fast.
When all three pieces are completed, you join each onto one 29"+ circular needle and work one long round to join them all together (having left of 8% body circumference for the underarm on each piece) - this is the longest round you will work. From this point, you choose a yoke treatment and get to the good stuff!
The Seamless Hybrid is a tasty mixture of a standard raglan and a saddle-shoulder pullover. Work the first portion of the yoke with standard raglan decreasing, although, because we're working in the round, we can decrease at a rate of every third row (rather than every second or fourth) which gives the IDEAL raglan slope, and starts securing that wonderful fit. After a certain number of stitches have been decreased, its time to saddle up. From here on out, you will be working just the sleeve stitches back and forth, making a saddle that slowly approaces the center neck, leaving the body stitche s live on the needle. How is it seamless? As you work the saddle, you knit the last stitch of each row TOGETHER WITH ONE LIVE STITCH OF THE BODY. You are seaming up the top of the piece as you build it.(Seriously, I'm excited just explaining it). When you reach the collar - you bind of half of the stitches of the saddle and continue working them across the back. This means the neck hole is merely the front half of the sleeve saddle, in the center of the sweater. When both saddles meet in the middle, you kitchener graft them together and BAM, your sweater is all seamed up. Pop a collar on that bad boy and you're ready-to-wear.
(I realize that this description may be convolluted and confusing (much like the pattern writing!) I had to read and re-read multiple times to envision it correctly. If your having trouble, just make one, it'll all make sense to you then)
Below I have included visuals of the yoke construction (Click on them to see them in greater detail):


front of yoke :: back of yoke
Modifications/Personalization:
How do you make it your own? Well, first off - any sweater you make from such a general recipe will be indiviudalized based on your yarn choices: guage, drape, shaping, blah blah blah. Its the same old story. I chose to add a wide (about 2") turned hem at the sleeve and body cuffs. I liked how this added a little weight to the bottom half of the piece. It also gave me an opportunity to add a contrasting color on the hem facings.
Recognize it? Thats a little leftover Rowanspun DK from this. I like the semi-off-the-wall color combo, and the union of tweeds. (Is there any better union?)
Some of you asked about how I did this, and its a suuuuper simple process: With contrasting yarn (Rowanspun) provisionally cast-on 90% the number of stitches you plan on having at the base of your sleeve. Knit these stitches to desired cuff length (2"). Knit one round with Main Yarn (Yorkshire Tweed), increasing evenly up to 100% of cuff circumference. Purl one round (this is your turning round). Now begin to knit normally with your Main Yarn. When you have knit the equal length with your Main Yarn that you had previously done with your Contrasting Yarn (2"), it is time to join them together: Fold the hem and begin your round, knitting two stitches together on every stitch (one contrasting yarn stitch, and one main yarn stitch). Keeping with the whole "seamless" theme, we are bypassing the insanely annoying step of sewing down hem facings (cringe). *NOTE: you are knitting together 10% more Main Yarn stitches than Contrast Yarn Stitches... you will need to calculate for this and skip a K2tog every once in a while (you'll only knit the Main Color by itself).
EZ suggested finishing with a hemmed collar as well - which was my original plan. However, when I did this it looked rotten. It really didn't fit. So I went with a 1x1 ribbed collar and a tubular (kitchener) bind off (i love how clean that one is). I like the finished product

So... now that I've written a short thesis, I'll conclude. I hope this was in some way informative and not too confusing. My main goal here is to spread ideas and inspiratin about sweater construction. Thats what keeps me coming back to all this you know.
And for the record, this is my best fitting garment yet - I really like how it feels, and post blocking, my wool-too-scratchy worries were soothed, its definitely wearable! I've been sportin it around in this rainy Chicago weather for 3 days already
and its back to knitting.
And for the record, this is my best fitting garment yet - I really like how it feels, and post blocking, my wool-too-scratchy worries were soothed, its definitely wearable! I've been sportin it around in this rainy Chicago weather for 3 days already
and its back to knitting.
Comments:
also:
"You are seaming up the top of the piece as you build it.(Seriously, I'm excited just explaining it)."
i can't tell you how glad i am that there are super-nerds just like me out there! hehe...
Gorgeous sweater!
I loved your Seamless Hybrid Sweater.
Excusez-moi, je ne parle pas l'Anglais. Mais j'ai beaucoup aimé ton ouvrage; c'est vraiment très joli!
beatiful job! :)
Meg
It's the next sweater on my list. Bring on the cold weather.
Your explanation of the shoulders made perfect sense. I followed it easily.
What's happened to Raspy? It's one of my favourite patterns and I'm itching to see what you've done with it.
You are one bad-ass knitter. Glad you're diggin' Chicago, too, despite the recent monsoons.
I'd just like to say (if I may) that I do, as a guy who knits, find your site, and more importantly, your skills and projects impressive and somewhat inspiring. Sometimes this provides me that little kick needed to pick up the needles again.
Again, awesome sweater!
since i've never knit for an adult man before, can you tell me how much ease you built in over your actual measurements? i love the perfect fit you got. I just wouldn't have the foggiest idea how much ease to build in.
Of course I am in love with the color choices. Bravo, man.
What's the chest measurement? You're scaring me with the 10 balls used.
You did a fabulous job on the sweater - it is really gorgeous and that color is great.
I truly think your knitting is perfect!
Wonderful.
Thanks for the inspiration
The colors you chose are so uplifting. I love your sweater :D
Hmm. Were the colours described as "Eggplant" and "Mustard", by any chance? (I don't eat either as a rule, but they do go well together in your jumper/sweater).
Congrats.
成人小說, 成人文章, 成人圖片區, 免費成人影片, 成人遊戲, 微風成人, 愛情公寓, 成人電影, A片, 情色, 情色貼圖, 情色文學, 做愛, 成人遊戲, 成人影城, 色情聊天室, 色情小說, 一葉情貼圖片區,
情色小說, 色情, 寄情築園小遊戲, 色情遊戲, 成人網站, 麗的色遊戲, 色情網站, 成人論壇, 情色視訊, 情色電影, aio交友愛情館, 言情小說, 愛情小說, 色情A片, 情色論壇, 自拍, 癡漢, , 俱樂部, 豆豆聊天室, 聊天室, 色情影片, 視訊聊天室, 免費視訊聊天,
免費視訊, 視訊美女, 視訊交友, 視訊聊天, 伊莉討論區, AV, 免費視訊聊天室, a片下載, aV, av片, A漫, av dvd, UT聊天室, 尋夢園聊天室, av成人網, 聊天室, 成人論壇, 正妹牆, 正妹百人斬, aio,伊莉, 本土自拍, 自拍, A片, 愛情公寓, 情色, 舊情人, 男同志聊天室, 色色網, ,嘟嘟情人色網, UT男同志聊天室, 情色貼圖, 情色文學, 情色交友, 色情聊天室, 色情小說, 成人聊天室, 成人小說, 一葉情貼圖片區, 情色小說, 日本A片, 成人網站, 色情, 色情遊戲, 情色視訊, 情色電影, 聊天室尋夢園, 080聊天室, aio交友愛情館,
色情a片, 一夜情, 辣妹視訊, 視訊聊天室, 免費視訊聊天, 情色論壇, 做愛, 做愛影片, av片, 色情網站, 免費視訊, 視訊, 視訊美女, 美女視訊, 女同志聊天室, 小高聊天室, 視訊交友, 視訊聊天, 免費視訊聊天室, 情人視訊網, 080苗栗人聊天室
, 6K聊天室, 影音視訊聊天室, 視訊交友
90739, 成人影片, 成人交友, 本土自拍
, 美女交友, 情色聊天室, 寄情築園小遊戲
, AV女優, A片下載,
碳雕
炭雕
活性炭
活性炭雕
空气净化产品
好想你枣
北京好想你枣
轴承
进口轴承
FAG轴承
NTN轴承
NSK轴承
SKF轴承
网站建设
网站推广
googel左侧优化
googel左侧推广
搜索引擎优化
仓壁振动器
给料机
分子蒸馏
短程蒸馏
薄膜蒸发器
导热油
真空泵油
胎毛笔
手足印
婴儿纪念品
婴幼儿纪念品
园林机械
草坪机
油锯
小型收割机
收割机
割灌机
割草机
电动喷雾器
地钻
采茶机
婚纱
北京婚纱
婚纱礼服
北京婚纱店
个性婚纱
礼服
北京礼服
礼服定制
礼服出租
飘人|飘人2008|云淡风清
铣刀
意大利留学
留学意大利
钢管舞
钢管舞培训
北京钢管舞
爵士舞
北京音皇国际
泳池设备
桑拿设备
印刷厂
油锯
割草机
绿篱机
风力灭火机
留学意大利
意大利留学
好日子小吃车
好日子烧烤小吃车
好日子多功能小吃车
好日子烧烤车
中频感应熔炼锻造设备
高频感应加热钎焊设备
保护膜
佛具
律师事务所
北京律师事务所
法律咨询
北京律师
北京法律咨询
小吃车
多功能小吃车
烧烤小吃车
烧烤车
拓展训练
水泥艺术围栏
水泥艺术围栏设备
水泥艺术围栏机械
水泥栅栏设备
艺术护栏
艺术栏杆
环保艺术围栏
环保围栏
环保围栏机械
环保围栏设备
彩色艺术围栏
花瓶柱
阳台柱
阳台护栏设备
阳台护栏
北京写字楼
写字楼出租
写字楼租赁
塑料轴承
陶瓷轴承
破碎镐
铣刨机
china tours
china travel
china tour packages
tibet tour
泳池设备
桑拿设备
高低温试验箱
盐雾试验箱
割草机
风力灭火机
绿篱机
输液轨道
输液吊架
轨道输液架
医用吊架
天轨输液吊杆
医用扶手
输液架
设备带
治疗带
中心供氧
博客1
博客2
博客3
博客4
博客5
博客6
博客7
博客8
博客9
博客10
博客11
博客12
博客13
博客14
博客15
博客16
博客0
博客刘
网站建设
网站推广
googel左侧优化
googel左侧推广
搜索引擎优化
铜铝连接管
铜铝连接管焊机
千古一香小吃车
千古一香烧烤小吃车
千古一香多功能小吃车
千古一香无烟烧烤小吃车
搬家公司
北京搬家公司
北京朝阳区搬家公司
通州区搬家公司
北京通州区搬家
海淀区搬家公司
北京市丰台搬家公司
冷缠防腐胶带
环氧煤沥青冷缠带
防腐漆涂料
防腐材料
聚丙烯增强纤维防腐胶带
环氧富锌底漆
耐高温漆涂料
环氧树脂漆
环氧煤沥青
玻璃鳞片涂料胶泥
机柜
IBM机柜
APC机柜
VEOR机柜
切换器
多功能小吃车
小吃车
好日子小吃车
好日子多功能小吃车
一品香小吃车
千古一香小吃车
上海租车
上海汽车租赁
上海租车网
平安保险北京
北京平安保险
情趣用品,情趣用品,情趣用品,情趣用品,情趣用品,情趣用品,情趣用品,情趣用品,情趣用品,情趣用品,情趣用品,情趣用品,情趣用品,情趣用品,情趣用品,情趣用品,情趣用品,情趣用品,情趣用品,情趣用品,
情趣用品,情趣用品,情趣用品,情趣用品,情趣用品,情趣用品,情趣用品,情趣用品,情趣用品,情趣,情趣,情趣,情趣,情趣,情趣,
情趣,情趣,情趣,情趣,情趣,情趣,情趣,情趣,情趣,情趣,情趣,情趣,情趣,情趣,情趣,情趣,情趣,情趣,情趣,情趣,情趣,
情趣,情趣,情趣,情趣,情趣,情趣,情趣,情趣,情趣,情趣,情趣,情趣,情趣,情趣,潤滑液,自慰套,威而柔,威而柔,
威而柔,威而柔,自慰套,跳蛋,按摩棒,充氣娃娃,自慰套,潤滑液,威而柔,FleshLight,跳蛋,按摩棒,充氣娃娃,跳蛋,按摩棒,FleshLight,充氣娃娃,
情趣商品,情趣網站,情趣網站,潤滑液,性感內衣,充氣娃娃,按摩棒,情趣精品,跳蛋,情趣網站,情趣商品,跳蛋,FleshLight,充氣娃娃,情趣內衣,情趣精品,按摩棒,威而柔,自慰套,成人玩具,
Nexus,lelo,聰明球,後庭,後庭g點,g點,美國fleshlight,STU訓練大師,Fleshgirls,Toys Heart,Tenga,日本 Vibratex,日本Toys Heart ,日本Tenga,美國aneros,rudeboy,英國rudeboy,英國Rocksoff,
德國Fun Factory,Fun Factory,英國甜筒造型按摩座,甜筒造型按摩座,英國Rock Chic ,瑞典 Lelo ,英國Emotional Bliss,英國 E.B,荷蘭 Natural Contours,荷蘭 N C,美國 OhMiBod,美國 OMB,Naughti Nano ,音樂按摩棒,ipod按摩棒,美國 The Screaming O,一本道,
美國TSO,美國TOPCO,美國Doc Johnson,美國CA Exotic,美國CEN,美國Nasstoy,美國Tonguejoy,英國Je Joue,美國Pipe Dream,美國California Exotic,美國NassToys,美國Vibropod,美國Penthouse,仿真按摩棒,矽膠按摩棒,猛男倒模,真人倒模,
仿真倒模,PJUR,Zestra,適趣液,穿戴套具,日本NPG,雙頭龍,FANCARNAL,日本NIPPORI,日本GEL,日本Aqua Style,美國WET,費洛蒙,費洛蒙香水,仿真名器,av女優,打炮,本土自拍,S1,
做愛,性愛,口交,吹喇叭,肛交,魔女訓練大師,無線跳蛋,有線跳蛋,震動棒,震動保險套,震動套,TOY-情趣用品,情趣用品網,情趣購物網,成人用品網,情趣用品討論,成人購物網,鎖精套,SKY ANGEL,
鎖精環,持久環,持久套,拉珠,逼真按摩棒,名器,超名器,逼真老二,電動自慰,自慰,打手槍,仿真女郎,SM道具,SM,性感內褲,仿真按摩棒,線上A片,免費A片,ALICE JAPAN,
pornograph,hunter系列,h動畫,成人動畫,成人卡通,情色動畫,情色卡通,色情動畫,色情卡通,無修正,禁斷,人妻,極悪調教,姦淫,近親相姦,顏射,盜攝,偷拍,SOD,
素人自拍,公園露出,街道露出,野外露出,誘姦,迷姦,輪姦,凌辱,痴漢,痴女,素人娘,中出,巨乳,調教,潮吹,色情影音,色情光碟,皇冠系列,老虎系列,交友,
av,a片,成人影片,成人影音,線上影片,成人光碟,成人無碼,成人dvd,情色影音,情色影片,情色dvd,情色光碟,航空版,薄碼,色情dvd,A片下載,成人電影,色情電影,TOKYO HOT,
東京熱,亞熱,武士系列,新潮館,婚友社,婚友社,婚友社,大陸新娘,大陸新娘,大陸新娘,越南新娘,外籍新娘,外籍新娘,台中坐月子中心,搬家公司,線上客服,網頁設計,
整型,貸款,宜蘭民宿,花蓮民宿,未婚聯誼,珠海,下川島,常平,澳門機票,香港機票,婚友,婚友社,未婚聯誼,未婚聯誼,婚友,交友,
Post a Comment
<< Home
that wasn't confusing (to me) at all! i really need to get that book. it's been on my wishlist for a while.
also:
"You are seaming up the top of the piece as you build it.(Seriously, I'm excited just explaining it)."
i can't tell you how glad i am that there are super-nerds just like me out there! hehe...
Such a beautiful example of the EZ formula. I would like to congratulate you on your lovely saddle shoulder. Would also like to ask how your saddle is so smooth? I tried one of these last winter with Rowanspun Aran and my saddle came out all wonky. Do you have any tips for that process? Perhaps I was not doing the Hybrid but the "Brooks" saddle shoulder from "The Opinionated Knitter". That's it, I made a different sweater. I will try again with the Hybrid formula.
Gorgeous sweater!
Hi!
I loved your Seamless Hybrid Sweater.
Excusez-moi, je ne parle pas l'Anglais. Mais j'ai beaucoup aimé ton ouvrage; c'est vraiment très joli!
I love the sweater - I MUST get that book - but I really love how you did the hems, especially the contrast color. One question: Does starting with 10% less stiches solve the hem flipping up problem?
beatiful job! :)
Meg
I adore everything about your sweater! I've been lurking around that EZ pattern ever since my dog chewed up the library's copy. Fortunately, I had to buy the book. Best "forced" purchase ever.
It's the next sweater on my list. Bring on the cold weather.
You and your damn sweater; my cousin saw it and now won't stop pestering me for one. I'm trying to convince him to learn to knit and make one himself.
I think those saddle shoulders are particularily suited to men. I wouldn't put it on a woman's sweater. But there are plenty of designs for women, so it's really nice to get something good for the guys.
Your explanation of the shoulders made perfect sense. I followed it easily.
Absolutely smashing. Just Awesome. So. Tweedy......... It really is great, and so well done. Your photos also do it more than justice.
I find the garments you make so satisfying - the observation, the mouthwatering attention to detail, the eye for colour - I feel so satisfied that I feel as if I've done it all myself and now I can't quite understand why I don't have anything to show for it. Vicarious painstakingness.
What's happened to Raspy? It's one of my favourite patterns and I'm itching to see what you've done with it.
That sweater is positively amazing! I am inspired to make one identically for my boyfriend--I knit him a sweater once ages ago (5 years?) and it never quite fit, so I recently took it out and have been waiting for the right look to come along. You definitely found it. Congrats!
Wow, amazing work, yet again. You must have a closet full of perfectly-fitting, stylish sweaters by now. Thanks for all the details, too.
Wow, Jared! Very stylish and definitely a great fit! I love the color, too! I wanted to put a contrasting hemline on my hourglass and I think now I'll rip back and use that provisional cast-on. You explained it perfectly!
I have some olive Malabrigo that has been waiting to become a sweater like this for my husband. Thanks for the inspiration and push to get it swatched up. I have to add, I adore the color you chose for your sweater. If my man was willing to let me dress him in that fabulous color, I think I'd drool all over him. Yum! ;)
What a stunning sweater! You pay such attention to detail. It makes my little perfectionist heart happy to see other knitters who get so painstaking with details. Very well done! Can't wait to see what you do next. :)
DUDE! That is SO cool, I can't wait to try that method. I agree with everyone above, NOT at all confusing. I love the contrasting facing thing, too. Plus the provisional cast on gives so many decorative options on a turned hem! The mind reels with possibilities! Thanks for sharing!
That jumper looks great, and I love the two colors knit together. You are a fantastic knitter, and I like the yoke too.
Brilliant! Glad to know that Rowanspun isn't as scratchy as I thought. I have plenty of eBay 10-packs in my stash and have been hesitant to use them for garments.
You are one bad-ass knitter. Glad you're diggin' Chicago, too, despite the recent monsoons.
As aforementioned, much praise.
I'd just like to say (if I may) that I do, as a guy who knits, find your site, and more importantly, your skills and projects impressive and somewhat inspiring. Sometimes this provides me that little kick needed to pick up the needles again.
It's so stylish. I was a little sceptical about EZ's formula producing stylish sweaters. I was rather afraid that the sweaters will look ugh. Now I'm a believer!
Love it, love it, LOVE IT! Seriously...it is gorgeous in it's simplicity. Once again, you've knit a fabulous, inspiring sweater...which I will not forward the link to my bro...I am behind on knitting for him!
Thanks for such a great explanation. I had been looking at the KW/OT book and was feeling inspiration. Now after seeing your success and thesis, the inspiration has increased ten-fold. Now, if I can just finish making the yarn...
Amazing! I have the EZ book but would never have thought that sweater could look so good. Well done.
what a beautiful sweater. the color is wonderful and it looks like it's really comfortable - I need to get me one!
Wow. I really love the color combo you used in the contrasting hem - I think they go great! I really love the seamless idea - I have done a few sweaters this way, and they are my best fitting, most worn ones! EZ was such a goddess!
Wow... I am impressed with every knit object you display! This one is fantastic... I've been searching high and low for a sweater to knit for my boyfriend that he'd actually wear...and voila! He saw your Hybrid and is hooked! The tweed is doubly exciting... I heart tweed... and have recently become a Rowan-Hargreaves fanatic. Your website is pure knitting porn for this tweed-hearting girl. Will be knitting *one of everything* out of Vintage Knits this fall and winter.
Again, awesome sweater!
Just throw this gush on the pile. Seriously awesome sweater, much appreciated explanation, great photos, I need one of these.
that is truly stunning, and your description is inspiring. i'm feeling like i need to cave and knit my husband a sweater. the color is perfect, too. we're thinking of moving to brooklyn so if you bump into some guy wearing your matching sweater, you'll know who it is.
since i've never knit for an adult man before, can you tell me how much ease you built in over your actual measurements? i love the perfect fit you got. I just wouldn't have the foggiest idea how much ease to build in.
I've wanted to make one of those ever since seeing them in her book (something about the saddle shoulders), now all the more after seeing yours. Very nicely done!
i love a man that looks good in purple! it's the new pink! (actually, there never should have been a pink+men in the first place, but i digress) your sweater looks fantastic!
wow, thanks for all of your construction insight. i don't own knitting w/o tears but it looks like i'm definitely going to have to now! it looks like the sweater fits you perfectly. wear it proudly!
That is freaking brilliant. And it looks fantastic on you, too. The finishing may have been minimal, but it's exceptionally neat and elegant (love the neckline!)
I've wanted that EZ book for the longest time. Now that I see what can be done with her guidance, I think I'm going to go ahead and invest in a copy.
Of course I am in love with the color choices. Bravo, man.
It's fantastic, sir! I love the colors and the fit is wonderful.
What's the chest measurement? You're scaring me with the 10 balls used.
After seeing your photos on Flickr, I pulled out my copy of KWoT and revelled over the construction of the sweater as well. I can't wait to start one of my own now and am working on the yarn selection and everything. I'm in love with that color too.
That is so amazing! I immediately pulled out my own Knitting Without Tears and looked up the sweater... that's definitely on my to do list. I love all your knits and your blog...you have great taste.
i call them recipes too! my mama said this was because i am a cook. but it's wondrous to hear someone more skilled than me calling them that too.
Love the tweed, and the sweater is beautiful, beautiful, beautiful. Makes me want to drop everything and make one. i love the contrasting hems - great touch.
Fabulous. It's so simple but really beautifully made, and it fits you perfectly. I love your photographs - every one of them looks like it belongs in a knitting book.
I know I'm late in the game here to sing your praises, but - it's fabulous! Kudos for always making absolutely gorgeous, classic pieces for all of us to drool over. And my compliments to your photographer!
I love it. Great color combo and beautiful finishing details. This is one that I could get my M to wear, which is saying something.
its beauty is in the flawless simplicity and fit of it all -- turned under hems, st st body, crew neck, uniterrupted saddle shoulders. great execution. EZ would be proud.
This is one of the most original yet classic knits I have seen in a long time. Thanks for the inspiration!!
I looooove it. Can we see a closer close-up of the saddle where it joins the front? I'm wondering what it would look like if the saddle were the contrast color. Also, how do you feel about the squareness of the neckline? I think it's flattering on you, but maybe not on me... do you think adding a short row at the ends of the back-and-forth saddle rows would help fill in the corners a bit? Or is there something else you might suggest?
My Goodness I'm comment 84!!! This is a great sweater. I have been looking for the perfect sweater for my 30 year old son and I think I just found it. I love how you did the hem and the cuffs. I will copy your idea! Great job...you are an awesome artist.
Wow just look at all your commentors!
You did a fabulous job on the sweater - it is really gorgeous and that color is great.
I truly think your knitting is perfect!
Wow, I love the sweater. It's so simple, but looks so functional and warm to boot. I really like the idea of knitting an entire sweater in the round, as I'm somewhat intimidated by the men's sweater patterns I've seen that involve so many different pieces. This seems like a great way to get started in the world of sweaters. Thanks for the inspiration!
Again, amazing work! Thanks for the explanation! As a beginner, every drop of information is welcome. This was really inspiring...
I love this sweater. My boyfriend saw it and immediatly wanted one for himself. Plus the photos of your stuff are stunning.
Such a beautiful sweater - sometimes simple is better than fancy and complicated! I'm inspired - I'm going to knit a stockinette sweater - maybe even an EZ recipe. Thanks for your great blog!
That looks really nifty! I finally decided to ignore the boyfriend-sweater-curse thing and knit my SO a sweater, and I bet he'd like something simple and casual like that. Cool cuff facings, too!
Wow. I just found your blog via Splityarn, and I'm impressed by your style. Gorgeous photos, I need to poke around now see what else you've made...
I am using the same yarn in blue to make my first sweater vest - didn't know it was anyone's pattern, I was just guessing from the shape of a sweater that fits me well. I will have a fair bit of yarn left over and you're tempting me to add sleeves to it - the saddle shoulder is beautiful.
gorgeous color choice. and I am digging the contrast color in the hem.
Wonderful.
Thanks for the inspiration
You learn something old every day! I'm going to have to take a fresh look at Knitting Without Tears. Inspiring work.
Three cheers for EZ and for you doing such a find adaptation. My Mom gave me Knitting Without Tears, years and years ago. It changed how I knit, how I look at knitting and my whole idea of everything knitted. Good job on the sweater and I love the contrasting colors!
I love your personal modifications, especially the contrasting hem facings.
The colors you chose are so uplifting. I love your sweater :D
The colours you chose are fabulous, as is the end result. Thanks for pointing me back in the direction of that book. It's been languishing on the shelf for a while now.
I'm an extremely late commenter but was linked to this via another blog. Thanks so much for the example, finally I have something I'm willing to make for my husband!
That sweater is awesome! Your description answered so many questions I had about the construction. I really can't wait to start mine. Cheers!
the book arrived in the mail today, and I read at Zimmermaniacs how some people were able to grasp the construction of her garments when there was a post somewhere to supplement her "pithy" instructions, so well done. I've alway found a few pics can aid to getting the head around those "huh, what?" situations.
Hmm. Were the colours described as "Eggplant" and "Mustard", by any chance? (I don't eat either as a rule, but they do go well together in your jumper/sweater).
Congrats.
Very late thank you for this post. I'd reached the saddle/shirt yoke and panic hit. I was so glad to find your post.
免費A片, ut聊天室, AV女優, 美女視訊, 免費成人影片, 成人論壇, 情色交友, 免費AV, 線上a片, 日本美女寫真集, 同志聊天室, 聊天室交友, 成人文章, 成人圖片區, 色情網站, 辣妹視訊, 美女交友, 微風成人區, 色美媚部落格, 色情影片, 成人影片, 成人網站, 免費A片, 上班族聊天室, A片,H漫, 18成人, a漫, av dvd, 一夜情聊天室, 微風成人, 成人圖片, 成人漫畫, 情色網, 日本A片, 免費A片下載, 性愛, 成人交友, 嘟嘟成人網, 嘟嘟成人網, 成人貼圖, 成人電影, 成人, 中部人聊天室, 080中部人聊天室, 成人貼圖,
成人小說, 成人文章, 成人圖片區, 免費成人影片, 成人遊戲, 微風成人, 愛情公寓, 成人電影, A片, 情色, 情色貼圖, 情色文學, 做愛, 成人遊戲, 成人影城, 色情聊天室, 色情小說, 一葉情貼圖片區,
情色小說, 色情, 寄情築園小遊戲, 色情遊戲, 成人網站, 麗的色遊戲, 色情網站, 成人論壇, 情色視訊, 情色電影, aio交友愛情館, 言情小說, 愛情小說, 色情A片, 情色論壇, 自拍, 癡漢, , 俱樂部, 豆豆聊天室, 聊天室, 色情影片, 視訊聊天室, 免費視訊聊天,
免費視訊, 視訊美女, 視訊交友, 視訊聊天, 伊莉討論區, AV, 免費視訊聊天室, a片下載, aV, av片, A漫, av dvd, UT聊天室, 尋夢園聊天室, av成人網, 聊天室, 成人論壇, 正妹牆, 正妹百人斬, aio,伊莉, 本土自拍, 自拍, A片, 愛情公寓, 情色, 舊情人, 男同志聊天室, 色色網, ,嘟嘟情人色網, UT男同志聊天室, 情色貼圖, 情色文學, 情色交友, 色情聊天室, 色情小說, 成人聊天室, 成人小說, 一葉情貼圖片區, 情色小說, 日本A片, 成人網站, 色情, 色情遊戲, 情色視訊, 情色電影, 聊天室尋夢園, 080聊天室, aio交友愛情館,
色情a片, 一夜情, 辣妹視訊, 視訊聊天室, 免費視訊聊天, 情色論壇, 做愛, 做愛影片, av片, 色情網站, 免費視訊, 視訊, 視訊美女, 美女視訊, 女同志聊天室, 小高聊天室, 視訊交友, 視訊聊天, 免費視訊聊天室, 情人視訊網, 080苗栗人聊天室
, 6K聊天室, 影音視訊聊天室, 視訊交友
90739, 成人影片, 成人交友, 本土自拍
, 美女交友, 情色聊天室, 寄情築園小遊戲
, AV女優, A片下載,
铜米机
碳雕
炭雕
活性炭
活性炭雕
空气净化产品
好想你枣
北京好想你枣
轴承
进口轴承
FAG轴承
NTN轴承
NSK轴承
SKF轴承
网站建设
网站推广
googel左侧优化
googel左侧推广
搜索引擎优化
仓壁振动器
给料机
分子蒸馏
短程蒸馏
薄膜蒸发器
导热油
真空泵油
胎毛笔
手足印
婴儿纪念品
婴幼儿纪念品
园林机械
草坪机
油锯
小型收割机
收割机
割灌机
割草机
电动喷雾器
地钻
采茶机
婚纱
北京婚纱
婚纱礼服
北京婚纱店
个性婚纱
礼服
北京礼服
礼服定制
礼服出租
飘人|飘人2008|云淡风清
铣刀
意大利留学
留学意大利
钢管舞
钢管舞培训
北京钢管舞
爵士舞
北京音皇国际
泳池设备
桑拿设备
印刷厂
油锯
割草机
绿篱机
风力灭火机
留学意大利
意大利留学
好日子小吃车
好日子烧烤小吃车
好日子多功能小吃车
好日子烧烤车
中频感应熔炼锻造设备
高频感应加热钎焊设备
保护膜
佛具
律师事务所
北京律师事务所
法律咨询
北京律师
北京法律咨询
小吃车
多功能小吃车
烧烤小吃车
烧烤车
拓展训练
水泥艺术围栏
水泥艺术围栏设备
水泥艺术围栏机械
水泥栅栏设备
艺术护栏
艺术栏杆
环保艺术围栏
环保围栏
环保围栏机械
环保围栏设备
彩色艺术围栏
花瓶柱
阳台柱
阳台护栏设备
阳台护栏
北京写字楼
写字楼出租
写字楼租赁
塑料轴承
陶瓷轴承
破碎镐
铣刨机
china tours
china travel
china tour packages
tibet tour
泳池设备
桑拿设备
高低温试验箱
盐雾试验箱
割草机
风力灭火机
绿篱机
输液轨道
输液吊架
轨道输液架
医用吊架
天轨输液吊杆
医用扶手
输液架
设备带
治疗带
中心供氧
博客1
博客2
博客3
博客4
博客5
博客6
博客7
博客8
博客9
博客10
博客11
博客12
博客13
博客14
博客15
博客16
博客0
博客刘
网站建设
网站推广
googel左侧优化
googel左侧推广
搜索引擎优化
铜铝连接管
铜铝连接管焊机
千古一香小吃车
千古一香烧烤小吃车
千古一香多功能小吃车
千古一香无烟烧烤小吃车
搬家公司
北京搬家公司
北京朝阳区搬家公司
通州区搬家公司
北京通州区搬家
海淀区搬家公司
北京市丰台搬家公司
冷缠防腐胶带
环氧煤沥青冷缠带
防腐漆涂料
防腐材料
聚丙烯增强纤维防腐胶带
环氧富锌底漆
耐高温漆涂料
环氧树脂漆
环氧煤沥青
玻璃鳞片涂料胶泥
机柜
IBM机柜
APC机柜
VEOR机柜
切换器
多功能小吃车
小吃车
好日子小吃车
好日子多功能小吃车
一品香小吃车
千古一香小吃车
上海租车
上海汽车租赁
上海租车网
平安保险北京
北京平安保险
情趣用品,情趣用品,情趣用品,情趣用品,情趣用品,情趣用品,情趣用品,情趣用品,情趣用品,情趣用品,情趣用品,情趣用品,
情趣用品,情趣用品,情趣用品,情趣用品,情趣用品,情趣用品,情趣用品,情趣用品,情趣用品,情趣用品,情趣用品,情趣用品,情趣用品,情趣用品,情趣用品,情趣用品,情趣用品,情趣用品,情趣用品,情趣用品,
情趣用品,情趣用品,情趣用品,情趣用品,情趣用品,情趣用品,情趣用品,情趣用品,情趣用品,情趣,情趣,情趣,情趣,情趣,情趣,
情趣,情趣,情趣,情趣,情趣,情趣,情趣,情趣,情趣,情趣,情趣,情趣,情趣,情趣,情趣,情趣,情趣,情趣,情趣,情趣,情趣,
情趣,情趣,情趣,情趣,情趣,情趣,情趣,情趣,情趣,情趣,情趣,情趣,情趣,情趣,潤滑液,自慰套,威而柔,威而柔,
威而柔,威而柔,自慰套,跳蛋,按摩棒,充氣娃娃,自慰套,潤滑液,威而柔,FleshLight,跳蛋,按摩棒,充氣娃娃,跳蛋,按摩棒,FleshLight,充氣娃娃,
情趣商品,情趣網站,情趣網站,潤滑液,性感內衣,充氣娃娃,按摩棒,情趣精品,跳蛋,情趣網站,情趣商品,跳蛋,FleshLight,充氣娃娃,情趣內衣,情趣精品,按摩棒,威而柔,自慰套,成人玩具,
Nexus,lelo,聰明球,後庭,後庭g點,g點,美國fleshlight,STU訓練大師,Fleshgirls,Toys Heart,Tenga,日本 Vibratex,日本Toys Heart ,日本Tenga,美國aneros,rudeboy,英國rudeboy,英國Rocksoff,
德國Fun Factory,Fun Factory,英國甜筒造型按摩座,甜筒造型按摩座,英國Rock Chic ,瑞典 Lelo ,英國Emotional Bliss,英國 E.B,荷蘭 Natural Contours,荷蘭 N C,美國 OhMiBod,美國 OMB,Naughti Nano ,音樂按摩棒,ipod按摩棒,美國 The Screaming O,一本道,
美國TSO,美國TOPCO,美國Doc Johnson,美國CA Exotic,美國CEN,美國Nasstoy,美國Tonguejoy,英國Je Joue,美國Pipe Dream,美國California Exotic,美國NassToys,美國Vibropod,美國Penthouse,仿真按摩棒,矽膠按摩棒,猛男倒模,真人倒模,
仿真倒模,PJUR,Zestra,適趣液,穿戴套具,日本NPG,雙頭龍,FANCARNAL,日本NIPPORI,日本GEL,日本Aqua Style,美國WET,費洛蒙,費洛蒙香水,仿真名器,av女優,打炮,本土自拍,S1,
做愛,性愛,口交,吹喇叭,肛交,魔女訓練大師,無線跳蛋,有線跳蛋,震動棒,震動保險套,震動套,TOY-情趣用品,情趣用品網,情趣購物網,成人用品網,情趣用品討論,成人購物網,鎖精套,SKY ANGEL,
鎖精環,持久環,持久套,拉珠,逼真按摩棒,名器,超名器,逼真老二,電動自慰,自慰,打手槍,仿真女郎,SM道具,SM,性感內褲,仿真按摩棒,線上A片,免費A片,ALICE JAPAN,
pornograph,hunter系列,h動畫,成人動畫,成人卡通,情色動畫,情色卡通,色情動畫,色情卡通,無修正,禁斷,人妻,極悪調教,姦淫,近親相姦,顏射,盜攝,偷拍,SOD,
素人自拍,公園露出,街道露出,野外露出,誘姦,迷姦,輪姦,凌辱,痴漢,痴女,素人娘,中出,巨乳,調教,潮吹,色情影音,色情光碟,皇冠系列,老虎系列,交友,
av,a片,成人影片,成人影音,線上影片,成人光碟,成人無碼,成人dvd,情色影音,情色影片,情色dvd,情色光碟,航空版,薄碼,色情dvd,A片下載,成人電影,色情電影,TOKYO HOT,
東京熱,亞熱,武士系列,新潮館,婚友社,婚友社,婚友社,大陸新娘,大陸新娘,大陸新娘,越南新娘,外籍新娘,外籍新娘,台中坐月子中心,搬家公司,線上客服,網頁設計,
整型,貸款,宜蘭民宿,花蓮民宿,未婚聯誼,珠海,下川島,常平,澳門機票,香港機票,婚友,婚友社,未婚聯誼,未婚聯誼,婚友,交友,
Jared, PHENOMENAL work! I love the beautiful delicacy with which you knit. And, your photography? Forgetaboutit! I'm a new fan!
Thanks Jared. I am making my first K w/o Tears seamless sweater and doing the hem facing like you. It is even less steps than EZ describes. I saw a neat little detail in a Loro Piana sweater that I am going to try to rip off too. I will put a little cable in each side "seam", with my body decreases and increases flanking the seam. The original Loro Piana sweater had the little cable in the raglan "seam" and I thought it was such a charming detail that I'll give it a go in the side "seams" of the body. Very excited and am swatching the seam today! Thanks again for your great inspiration!
<< Home
