b r o o k l y n t w e e d
7.28.2007
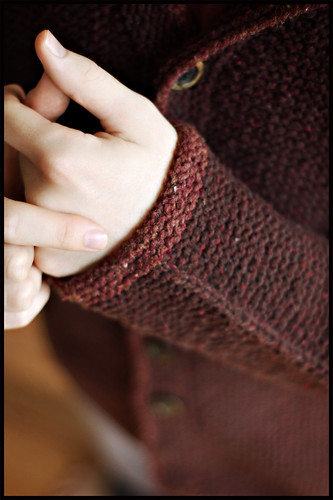
Cobblestone
First, for all of you who have seen the Fall Interweave Preview and sent e-mails - thank you! The upcoming issue features one of my sweater designs that I'm really excited about. If you've yet to catch the preview, check it out here - there's a bunch of great sweaters, it looks like a really great issue (though you can't really go wrong with Fall knitting, in my opinion).

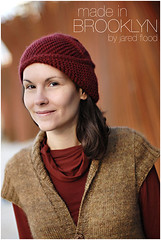
I designed and knit most of this while I was in Dublin last winter. Despite finding n'ery a yarn shop there, it was a great place to be inspired - plenty of wool, texture and color all around to get the creative juices flowing. The Cobblestone was a bar we spent an evening in listening to traditional Irish music on the North side of town - I thought the name was fitting.
My goal with this piece was simple shapes that would feature a nice tweedy wool and a goodly amount of texture without overdoing it. It's worked seamlessly with a round yoke and garter strips up the sides (below the underarms). A nice cozy sweater that I'm really looking forward to having around this winter.
Pictured is the medium size - my apologies for the wrinkles. I was forced to photograph this in a pinch, before wet blocking. You know how those deadlines are.
Thanks again for all your support - it is always very much appreciated. Happy knitting!
¶ 1:23 PM 151 comments
Pattern: Cobblestone Pullover
Source: Interweave Knits Fall 2007
Yarn: Classic Elite Skye Tweed in 'Upland Green'
Source: Interweave Knits Fall 2007
Yarn: Classic Elite Skye Tweed in 'Upland Green'
I designed and knit most of this while I was in Dublin last winter. Despite finding n'ery a yarn shop there, it was a great place to be inspired - plenty of wool, texture and color all around to get the creative juices flowing. The Cobblestone was a bar we spent an evening in listening to traditional Irish music on the North side of town - I thought the name was fitting.
My goal with this piece was simple shapes that would feature a nice tweedy wool and a goodly amount of texture without overdoing it. It's worked seamlessly with a round yoke and garter strips up the sides (below the underarms). A nice cozy sweater that I'm really looking forward to having around this winter.
Pictured is the medium size - my apologies for the wrinkles. I was forced to photograph this in a pinch, before wet blocking. You know how those deadlines are.
Thanks again for all your support - it is always very much appreciated. Happy knitting!
¶ 1:23 PM 151 comments
7.20.2007
Fiber Flashing Friday
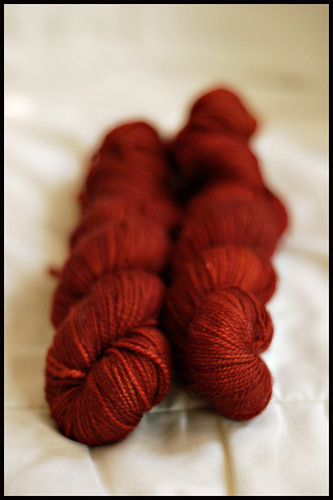
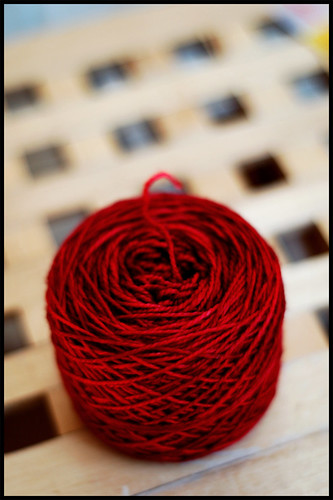
It's been awhile since I posted any gratuitous yarn shots on a Friday. And boy do I have some beauties to show you today. *Sundara Yarn. I think that's all there is to be said.

(I live in fear that I'll never find a project worthy of this perfect color)
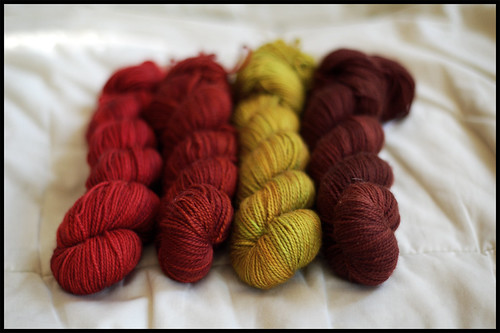
Did someone say colorwork?
Enjoy your weekend!
[*Yarn pictured is Sundara Sock in unique semi-solid dyelots.]
¶ 12:25 PM 52 comments
(I live in fear that I'll never find a project worthy of this perfect color)
Did someone say colorwork?
Enjoy your weekend!
[*Yarn pictured is Sundara Sock in unique semi-solid dyelots.]
¶ 12:25 PM 52 comments
7.19.2007
Letting the Yarn Do the Work
First things first: THANK YOU for your rather overwhelming reception of the Adult Tomten. I've had such a nice week reading and responding to your comments. Many knitters have started talk of making more, which excites me to no end. Please keep them coming!
In light of recent heat waves (hello July!), I've been working a little lighter. Simple projects with less blanket-ous qualities than my usual sweater line-up. Sure there are always sweaters on the needles, but there's a higher concentration of The Little Things.
The best thing about finishing my BSJ (aside from wanting to immediately start another), was realizing that I had a huge hank of handspun 2-ply leftover from my HelloYarn haul. Since knitting the BSJ was all garter all the time, I thought I'd just zone out on something simple and watch the yarn work its handspun, handdyed magic, this time in stockinette. And what magic it is!
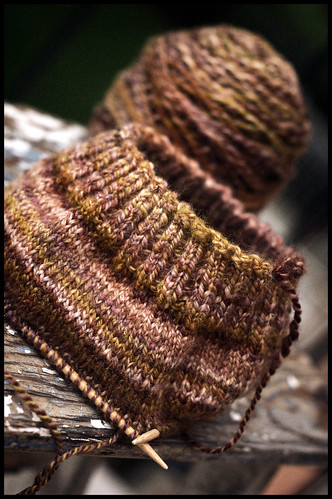
16" circular needles really make me happy.
A simple hat. I'm happy just watching the colors change and that unique handspun fabric grow.
And speaking of handspun, behind the scenes I've been quietly spinning away on my little drop spindle, trolling the internet and the library for information, exploiting spinner friends as resources, and teaching myself about this wonderful art.
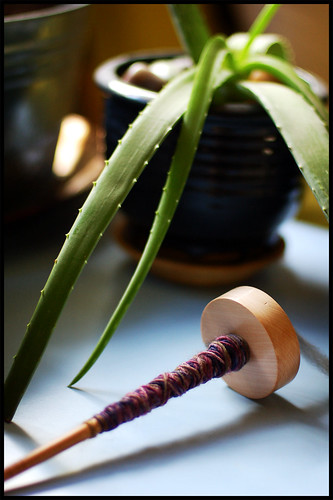
There's quite a learning curve, but its relaxing and mindless - think stockinette in the round - and is a nice way to take the edge off of your day. I like the idea that drop spindles are one of the earliest pieces of technology from some of the earliest civilizations.
Here's a quick photo tour of the evolution of 4 ounces of handdyed top through new spinning hands:
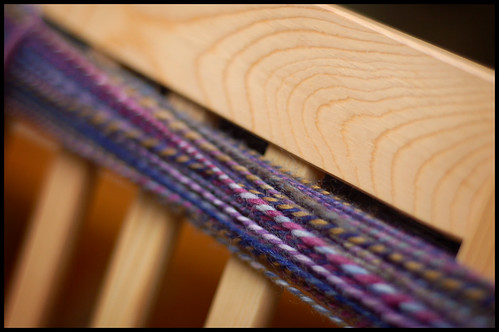
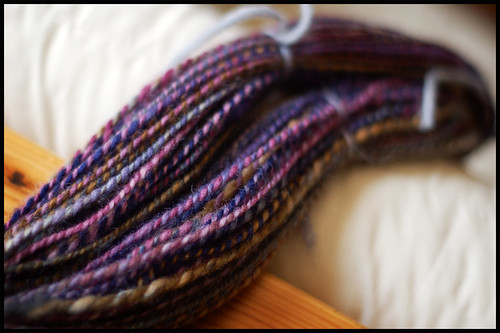
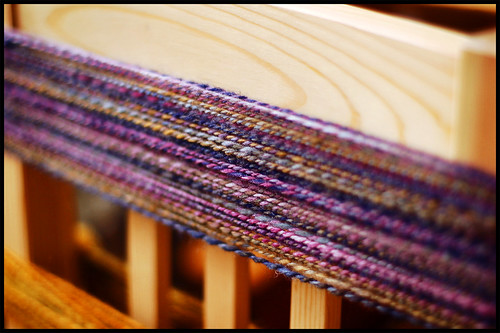
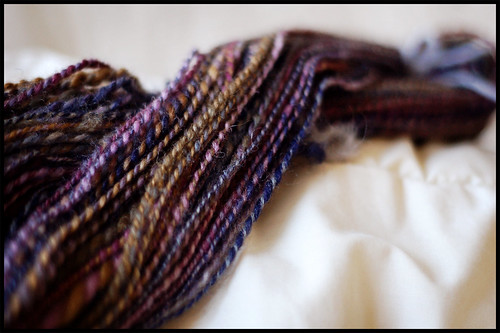
*Fiber pictured above is hand-dyed roving from Adrian.
Weekend knitting is just around the corner. Tally Ho!
¶ 9:42 AM 57 comments
In light of recent heat waves (hello July!), I've been working a little lighter. Simple projects with less blanket-ous qualities than my usual sweater line-up. Sure there are always sweaters on the needles, but there's a higher concentration of The Little Things.
The best thing about finishing my BSJ (aside from wanting to immediately start another), was realizing that I had a huge hank of handspun 2-ply leftover from my HelloYarn haul. Since knitting the BSJ was all garter all the time, I thought I'd just zone out on something simple and watch the yarn work its handspun, handdyed magic, this time in stockinette. And what magic it is!
16" circular needles really make me happy.
A simple hat. I'm happy just watching the colors change and that unique handspun fabric grow.
And speaking of handspun, behind the scenes I've been quietly spinning away on my little drop spindle, trolling the internet and the library for information, exploiting spinner friends as resources, and teaching myself about this wonderful art.
There's quite a learning curve, but its relaxing and mindless - think stockinette in the round - and is a nice way to take the edge off of your day. I like the idea that drop spindles are one of the earliest pieces of technology from some of the earliest civilizations.
Here's a quick photo tour of the evolution of 4 ounces of handdyed top through new spinning hands:
*Fiber pictured above is hand-dyed roving from Adrian.
Weekend knitting is just around the corner. Tally Ho!
¶ 9:42 AM 57 comments
7.11.2007
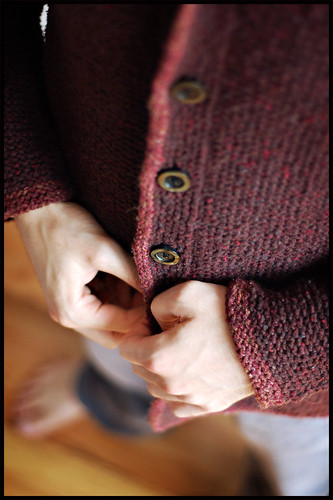
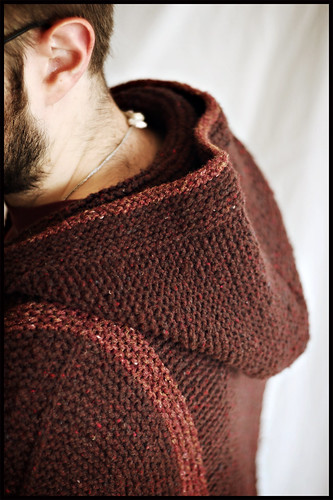
The Adult Tomten Jacket
My recent persistence with Elizabeth Zimmermann patterns and garter stitch in general have, in some way or another, all sprung from this inspiring wonder-project. Knitting the Adult Tomten was such a perfect balance of desirable knitting attributes, that I really miss working on it: mindless stitch pattern combined with interesting, architectural shaping, an amazing natural wool tweed which never got tiresome to look at or work with, a chunky enough yarn to consistently show progress no matter how short a time spent knitting, and above all, the idea of a comfy, thick, sproingy hooded jacket to envelop a wool-starved frame when the glorious cold finally comes back to us.
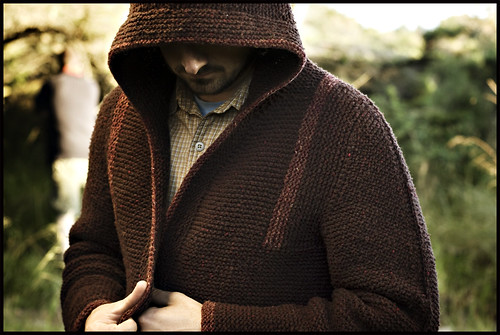
First things first, a little background info on the Tomten. Elizabeth conceived and knit the first Tomten Jacket for her infant son in 1940. The pattern as we know it (more or less) was released in 1961 in Elizabeth's 7th newsletter (reprinted with the rest of the collection in The Opinionated Knitter). The pattern has taken on variations over the years from both Elizabeth and Meg and made its way into two more classic publications: Knitting Without Tears, and Knitting Workshop. Tomten, the jacket's namesake, is a small Swedish elf who specializes in good deeds. According to Elizabeth, "your child will resemble him strangely, if you put a Tomten jacket on him or her." What do you think? Is it Elf-ish enough for you?
Modifications: Although EZ provides 'sizing' for an adult version - it's basically the same pattern worked in Sheepsdown, her superbulky weight wool (2-3sts/in). Despite wanting to knit a jacket in something a bit lighter than Sheepdown (I worked with fisherman weight wool), I knew I wanted to make some pretty major changes to the pattern to fit the proportions and shapes of an adult.
Elizabeth's pattern is a modular piece (she's nothing if not clever) - all numbers both vertical and horizontal are divisible by 4. This makes for intuitive and logical knitting... but also for a sort of boxy fit (great for the little ones!). Especially where armhole depth is concerned. Early on I decided to more or less throw the magic number out the window and knit to my measurements. Although I did choose to keep the signature 'quarters' for armholes and body/neck opening (detailed below), after all - it wouldn't be a Tomten without those.
The Tomten has DEEP armholes. When you reach the underarms, you basically divide the sweater into quarters: one quarter each for the armholes, leaving half of the sweater's stitches left over the middle for working front and back of the body. After working body fronts and back to desired armhole depth, you join them again into the round and work straight on to form that wonderful hood. While the construction is rather genius, you may notice that it leaves quite a ginormous neck opening. Half of your body circumference to be exact. And a 21" neck opening was just a tad much for me. Lets not even imagine the cavernous neck-openings on a men's XL.
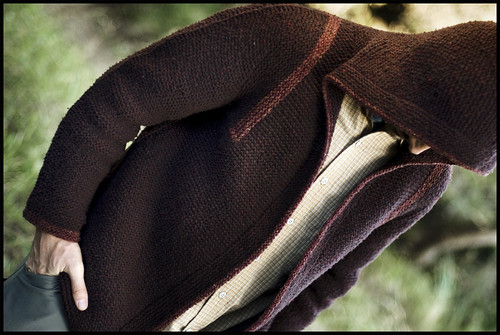
Neck Opening & Hood Mods: To address the neck opening issue and prepare for a nice smooth hood transition I did a few things. First, I threw in some v-neck shaping about 6 inches before shoulder tops. Since I was planning a wide button band to encircle the entire outer length of the hood and body, a v-neck seemed the smartest way of smoothly feeding the band onto the hood with ease. And no mitering or lumpy corners! Next, to give it a bit of structure I added two short shoulder seams at the top - this was also a way of shaving off excess width at the neck. On either side of body front and back, instead of joining the whole thing into the round, I did a 3 needle bind off over 10 stitches on either side (5 sts from front, 5 sts from back). This alone took away 20 stitches from the neck opening which for me was 5 inches. That landed me right around my target neck opening of about 16". To add a bit more sturdiness I chose to bind off at the neck as you would a regular pullover, rather than knitting directly the live neck opening stitches to form the hood. This creates a less stretchy neck opening. Combined with the small shoulder seams (3 needle bind-off makes a nice strong seam, even over 10 measly stitches) the structure at the shoulders and neck made something much more wearable, and durable to boot.
To make the hood then, I picked up stitches from the bound-off neck. I wanted a less trunk-ish hood that sort of hugged the neck a bit in the back. The first time I tried the hood I followed the pattern, increasing evenly over the first 14 rows until desired depth. After I finished it, however, I really didn't like it. Still too wide at the base, even despite the neck decreases employed earlier. I ripped it and made some modifications to the second version that I like very much. The most important was a sharp decrease across the back of the hood about a half inch after picking up neck stitches. I really wanted it to fit the contour of an actual human neck, so pulling it in just above the shoulders worked like a charm. After three rows of garter, I decreased 10 stitches evenly across the back half of the hood in one row. With my new counts I worked even for about 4-5 inches before beginning the hood increases (I just measured my neck and head to see when to start increasing.) When I worked to my desired hood depth (about 13.5"), I short rowed the last 3 rows to curve the top point just a bit. In the end, I was really glad I ripped and re-knit (aren't we always!?) because the 2nd hood fits great. Oh - and instead of a three-needle bind off, I did a garter stitch graft to join the top of the hood - you can't even tell there's a seam there! I love that graft.
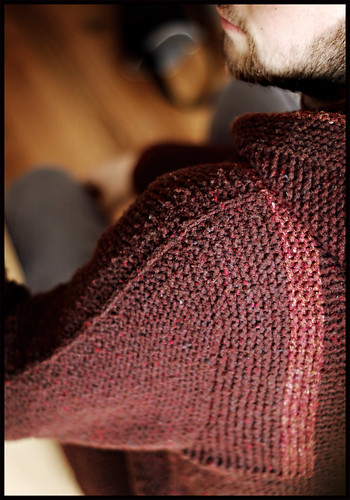
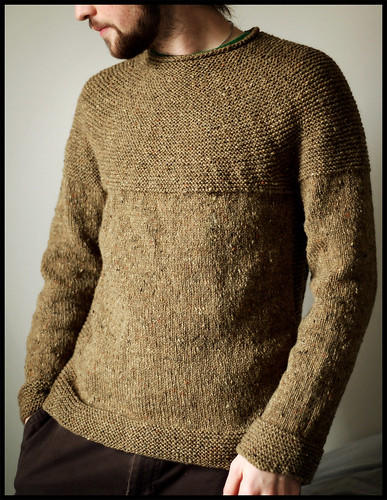
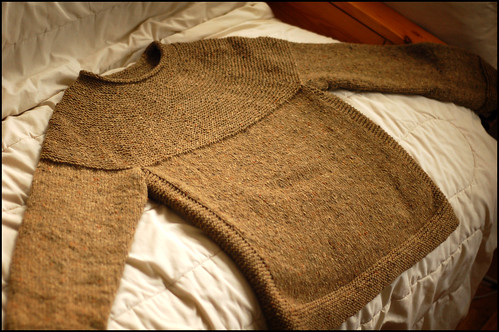
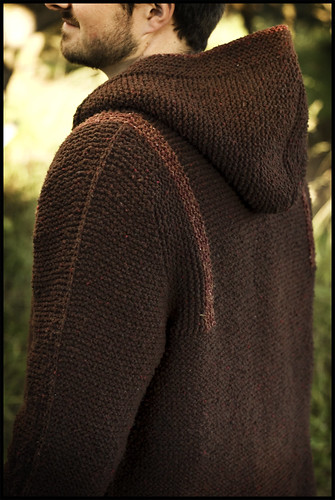
Armhole & Sleeve Mods: The armhole and sleeve cap modification is probably the most major change I made to the pattern. I explained in some detail the process here, if you'd like to review. Basically, I worked the deep armholes back and forth until I was about two-inches from consuming all armhole stitches (more or less I left underarm stitches to equal 8% of body circumference on a holder while working the sleeve caps, following a standard EPS seamless). I then began working a top-down set-in sleeve a la Barbara Walker in her masterpiece, starting with a third of the armhole stitches and working short rows back and forth, consuming an additional armhole stitch at the end of each row. It's really a genius little technique - I'm happy I got another chance to work it here. Of course because of the unique row gauge of garter stitch, I had to employ a decreasing scheme to work whilst doing the short rows on the cap. It was a bit like a knitting circus act, but in the end it worked out perfect. I'm really happy with how they fit. The picture above gives a nice little visual to the construction
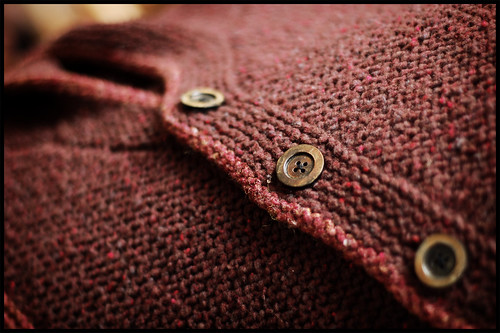
Details and Trimmings: The buttons called to me - so I ignored their price tag. They're medium sized horn carved buttons, a deep warmish brown with lighter brown marbling. I'm really happy how they turned out. Toggles were a contender, but traditional buttons won out in the end.
Among the many reasons for which I love this pattern, I really like the options you have for trimming with a contrast color. The 'suspender' strips are a unique feature made possible by those deep, square armholes - I couldn't pass them up. I snagged a contrast color when I placed my order for the wool and just sort of developed the accents as I went. I like the idea of trimming the sleeve cuffs for a little definition. Since the whole thing is in garter, the nice visual weight of cuff ribbing or textured stitches that we usually have when knitting a stockinette sweater wasn't really an option. Contrasting cuffs worked just fine though. I also liked the idea of trimming the entire hood and body with one continuous, thin strip of the contrast color. This is probably my favorite accent of all. I went back and forth on whether or not I thought an I-cord bind-off fit in with the sweater's look. In the end I decided to mimic an I-Cord bind off by working one ridge of garter stitch around the entire body/hood area in the contrast color, then bind off in purl from the RS. I'm really loving how it looks.
The last little accent I wanted to mention are the 'reverse seams.' On the tops of sleeves and 'seams' of the body, I threw in a vertical strip of Slip Stitch Stockinette. In other words, on every WS row I slipped the seam stitch with the yarn forward. This is what creates those neat little ridges running over the shoulder and down to the cuff. Some versions of the Tomten in The Opinionated Knitter have this detail, although I couldn't find it written in any version of the pattern.
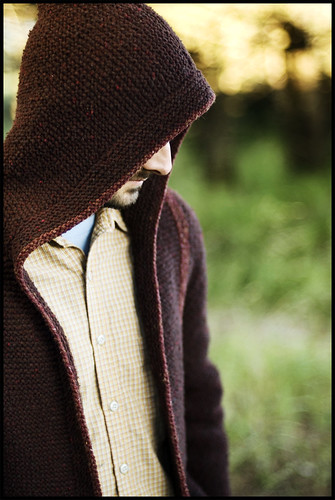
My longest post ever? Probably. There's so much to say about this sweater, I'm impressed if you made it through and I'm sure I've forgotten something. Overall, I couldn't be happier with how it turned out. I turn the A/C on in the apartment just to wear it. It seems I've been meaning to make a hooded sweater for years - I guess I don't need to feel bad about that any longer!
Big thanks to Adrian of HelloYarn for mutually spurning this project into motion (keep your eye on her, she's bound to drop her stunning version on us one of these days soon) as well as to my big bro for modeling the sweater during our Oregon Coast camping trip (the outdoor shots). For those of you wanting to make Tomten your own, feel free to e-mail me with questions. E-mail works better than comments (don't you just love Blogger?). I set up a gallery full of my Tomten pictures here, because there are so many of them! - feel free to peruse. This sweater really is priceless to me at this point so I'd be happy to watch the Adult Tomten Ministry spread!
Onward and upward. ¶ 3:40 PM 206 comments
Pattern: Adult Tomten Jacket
By: Elizabeth Zimmermann
Source: The Opinionated Knitter, Knitting w/o Tears, and Knitting Workshop
Materials: Beaverslide Fisherman-Weight McTaggart Tweed
Amount: 8 skeins in 'Mountain Mahogany'; 1 partial skein in 'Autumn Dogwood'
Needles: 5.0mm/US8 Addi Turbos
Start Date: 29 May 2007
Finish Date: 25 June 2007
(Buttons added July 3, 2007)
First things first, a little background info on the Tomten. Elizabeth conceived and knit the first Tomten Jacket for her infant son in 1940. The pattern as we know it (more or less) was released in 1961 in Elizabeth's 7th newsletter (reprinted with the rest of the collection in The Opinionated Knitter). The pattern has taken on variations over the years from both Elizabeth and Meg and made its way into two more classic publications: Knitting Without Tears, and Knitting Workshop. Tomten, the jacket's namesake, is a small Swedish elf who specializes in good deeds. According to Elizabeth, "your child will resemble him strangely, if you put a Tomten jacket on him or her." What do you think? Is it Elf-ish enough for you?
Modifications: Although EZ provides 'sizing' for an adult version - it's basically the same pattern worked in Sheepsdown, her superbulky weight wool (2-3sts/in). Despite wanting to knit a jacket in something a bit lighter than Sheepdown (I worked with fisherman weight wool), I knew I wanted to make some pretty major changes to the pattern to fit the proportions and shapes of an adult.
Elizabeth's pattern is a modular piece (she's nothing if not clever) - all numbers both vertical and horizontal are divisible by 4. This makes for intuitive and logical knitting... but also for a sort of boxy fit (great for the little ones!). Especially where armhole depth is concerned. Early on I decided to more or less throw the magic number out the window and knit to my measurements. Although I did choose to keep the signature 'quarters' for armholes and body/neck opening (detailed below), after all - it wouldn't be a Tomten without those.
The Tomten has DEEP armholes. When you reach the underarms, you basically divide the sweater into quarters: one quarter each for the armholes, leaving half of the sweater's stitches left over the middle for working front and back of the body. After working body fronts and back to desired armhole depth, you join them again into the round and work straight on to form that wonderful hood. While the construction is rather genius, you may notice that it leaves quite a ginormous neck opening. Half of your body circumference to be exact. And a 21" neck opening was just a tad much for me. Lets not even imagine the cavernous neck-openings on a men's XL.
Neck Opening & Hood Mods: To address the neck opening issue and prepare for a nice smooth hood transition I did a few things. First, I threw in some v-neck shaping about 6 inches before shoulder tops. Since I was planning a wide button band to encircle the entire outer length of the hood and body, a v-neck seemed the smartest way of smoothly feeding the band onto the hood with ease. And no mitering or lumpy corners! Next, to give it a bit of structure I added two short shoulder seams at the top - this was also a way of shaving off excess width at the neck. On either side of body front and back, instead of joining the whole thing into the round, I did a 3 needle bind off over 10 stitches on either side (5 sts from front, 5 sts from back). This alone took away 20 stitches from the neck opening which for me was 5 inches. That landed me right around my target neck opening of about 16". To add a bit more sturdiness I chose to bind off at the neck as you would a regular pullover, rather than knitting directly the live neck opening stitches to form the hood. This creates a less stretchy neck opening. Combined with the small shoulder seams (3 needle bind-off makes a nice strong seam, even over 10 measly stitches) the structure at the shoulders and neck made something much more wearable, and durable to boot.
To make the hood then, I picked up stitches from the bound-off neck. I wanted a less trunk-ish hood that sort of hugged the neck a bit in the back. The first time I tried the hood I followed the pattern, increasing evenly over the first 14 rows until desired depth. After I finished it, however, I really didn't like it. Still too wide at the base, even despite the neck decreases employed earlier. I ripped it and made some modifications to the second version that I like very much. The most important was a sharp decrease across the back of the hood about a half inch after picking up neck stitches. I really wanted it to fit the contour of an actual human neck, so pulling it in just above the shoulders worked like a charm. After three rows of garter, I decreased 10 stitches evenly across the back half of the hood in one row. With my new counts I worked even for about 4-5 inches before beginning the hood increases (I just measured my neck and head to see when to start increasing.) When I worked to my desired hood depth (about 13.5"), I short rowed the last 3 rows to curve the top point just a bit. In the end, I was really glad I ripped and re-knit (aren't we always!?) because the 2nd hood fits great. Oh - and instead of a three-needle bind off, I did a garter stitch graft to join the top of the hood - you can't even tell there's a seam there! I love that graft.
Armhole & Sleeve Mods: The armhole and sleeve cap modification is probably the most major change I made to the pattern. I explained in some detail the process here, if you'd like to review. Basically, I worked the deep armholes back and forth until I was about two-inches from consuming all armhole stitches (more or less I left underarm stitches to equal 8% of body circumference on a holder while working the sleeve caps, following a standard EPS seamless). I then began working a top-down set-in sleeve a la Barbara Walker in her masterpiece, starting with a third of the armhole stitches and working short rows back and forth, consuming an additional armhole stitch at the end of each row. It's really a genius little technique - I'm happy I got another chance to work it here. Of course because of the unique row gauge of garter stitch, I had to employ a decreasing scheme to work whilst doing the short rows on the cap. It was a bit like a knitting circus act, but in the end it worked out perfect. I'm really happy with how they fit. The picture above gives a nice little visual to the construction
Details and Trimmings: The buttons called to me - so I ignored their price tag. They're medium sized horn carved buttons, a deep warmish brown with lighter brown marbling. I'm really happy how they turned out. Toggles were a contender, but traditional buttons won out in the end.
Among the many reasons for which I love this pattern, I really like the options you have for trimming with a contrast color. The 'suspender' strips are a unique feature made possible by those deep, square armholes - I couldn't pass them up. I snagged a contrast color when I placed my order for the wool and just sort of developed the accents as I went. I like the idea of trimming the sleeve cuffs for a little definition. Since the whole thing is in garter, the nice visual weight of cuff ribbing or textured stitches that we usually have when knitting a stockinette sweater wasn't really an option. Contrasting cuffs worked just fine though. I also liked the idea of trimming the entire hood and body with one continuous, thin strip of the contrast color. This is probably my favorite accent of all. I went back and forth on whether or not I thought an I-cord bind-off fit in with the sweater's look. In the end I decided to mimic an I-Cord bind off by working one ridge of garter stitch around the entire body/hood area in the contrast color, then bind off in purl from the RS. I'm really loving how it looks.
The last little accent I wanted to mention are the 'reverse seams.' On the tops of sleeves and 'seams' of the body, I threw in a vertical strip of Slip Stitch Stockinette. In other words, on every WS row I slipped the seam stitch with the yarn forward. This is what creates those neat little ridges running over the shoulder and down to the cuff. Some versions of the Tomten in The Opinionated Knitter have this detail, although I couldn't find it written in any version of the pattern.
My longest post ever? Probably. There's so much to say about this sweater, I'm impressed if you made it through and I'm sure I've forgotten something. Overall, I couldn't be happier with how it turned out. I turn the A/C on in the apartment just to wear it. It seems I've been meaning to make a hooded sweater for years - I guess I don't need to feel bad about that any longer!
Big thanks to Adrian of HelloYarn for mutually spurning this project into motion (keep your eye on her, she's bound to drop her stunning version on us one of these days soon) as well as to my big bro for modeling the sweater during our Oregon Coast camping trip (the outdoor shots). For those of you wanting to make Tomten your own, feel free to e-mail me with questions. E-mail works better than comments (don't you just love Blogger?). I set up a gallery full of my Tomten pictures here, because there are so many of them! - feel free to peruse. This sweater really is priceless to me at this point so I'd be happy to watch the Adult Tomten Ministry spread!
Onward and upward. ¶ 3:40 PM 206 comments
7.05.2007
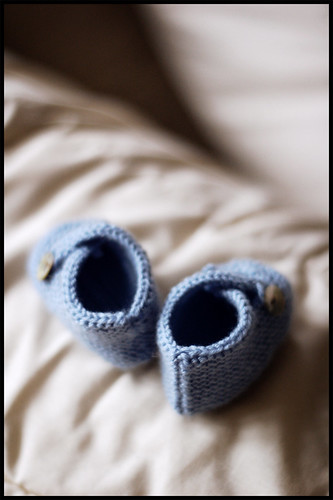
Saartje's Booties
The Big Garter-Stitch Baby Wave is coming to pass... but not before these hot little booties get some blog action! Here's a quick pattern that's so cute it'll get just about anyone's biological clock ticking!

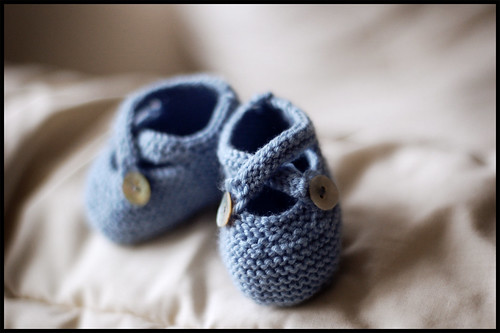
No modifications on this pattern. This is a quick knit and the booties are TINY. From my virtually non-existent experience with babies, I'd say these are fit for an average newborn, although I made the larger size of the two listed in the pattern. The great news is that you could work these in just about any weight of yarn to fit babies of all sizes, colors and creeds! I sort of have an impulse to cast on in a super tweedy dk wool... but I think I should wait. It's probably time to return to the world of adult knitting for a time, don't you agree?
And speaking of adult knitting (and more garter stitch), the Adult Tomten Jacket is DONE and let me tell you, it is a piece of work. I will do my best to serve it up this week sometime. I love it so much that I've already worn it several times, despite the summer heat and general ridiculous-ness of wearing a chunky garter-stitch sweater in July. In New York.
Thanks for all your vacation e-mails and comments. Oregon was, as usual, amazing and I'm sort of bummed about being home. We were stranded in Dallas for 30 hours coming home which was an absolute nightmare and also accounts for a very long and silent homecoming recovery. Things are pretty much back to normal now, so I should be hanging out around the 'Tweed a bit more. Hope you all had a happy 4th of July!
¶ 1:19 PM 67 comments
Pattern: 'Saartje's Bootees' [PDF] (or via Ravelry)
Source: Saartje Knits
Materials: RYC Cashsoft 4-ply in 'Spa' (one partial skein)
Needles: US1/2.25mm
Buttons: 4 teensy iridescent ones cut from mussel shells
Started and Completed: June 2007
Source: Saartje Knits
Materials: RYC Cashsoft 4-ply in 'Spa' (one partial skein)
Needles: US1/2.25mm
Buttons: 4 teensy iridescent ones cut from mussel shells
Started and Completed: June 2007
No modifications on this pattern. This is a quick knit and the booties are TINY. From my virtually non-existent experience with babies, I'd say these are fit for an average newborn, although I made the larger size of the two listed in the pattern. The great news is that you could work these in just about any weight of yarn to fit babies of all sizes, colors and creeds! I sort of have an impulse to cast on in a super tweedy dk wool... but I think I should wait. It's probably time to return to the world of adult knitting for a time, don't you agree?
And speaking of adult knitting (and more garter stitch), the Adult Tomten Jacket is DONE and let me tell you, it is a piece of work. I will do my best to serve it up this week sometime. I love it so much that I've already worn it several times, despite the summer heat and general ridiculous-ness of wearing a chunky garter-stitch sweater in July. In New York.
Thanks for all your vacation e-mails and comments. Oregon was, as usual, amazing and I'm sort of bummed about being home. We were stranded in Dallas for 30 hours coming home which was an absolute nightmare and also accounts for a very long and silent homecoming recovery. Things are pretty much back to normal now, so I should be hanging out around the 'Tweed a bit more. Hope you all had a happy 4th of July!
¶ 1:19 PM 67 comments