b r o o k l y n t w e e d
8.31.2009
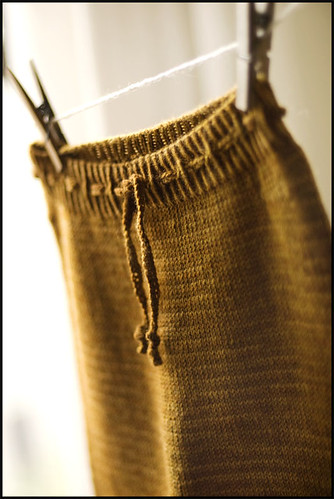
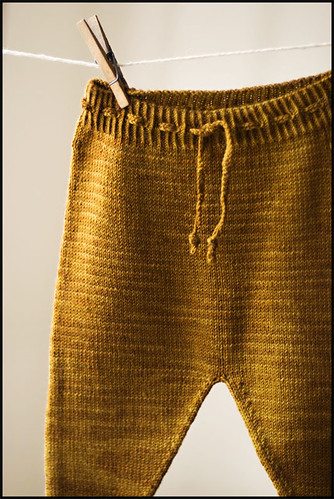
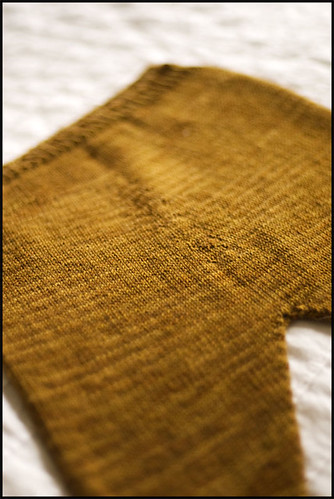
Baby Leggings
I've been doing a fair bit of traveling in the last two weeks and have committed to finishing a gaggle of small projects that I have lying around the house half-done. Knowing that I'll want to tackle lots of large, woolly projects in the very near future (hello, Fall weather!), I feel the need to do a little bit of project-house-cleaning. Consider yourself warned - you may see a few baby knits and old, forgotten accessories cropping up around here in the next couple of weeks. And today - the first one!

If you're interested in knitting a pair, be sure to check out Shibui's Pattern Page - lots of great patterns there to peruse if you have a few minutes! Now... time to send these babies back to Portland, from whence they came!
¶ 12:23 PM 34 comments

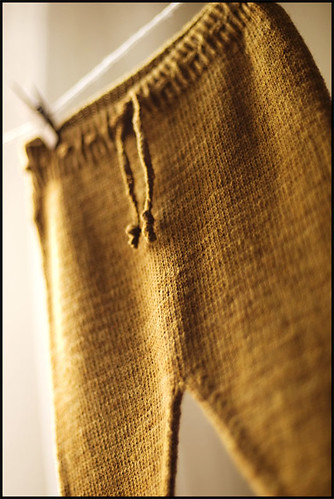
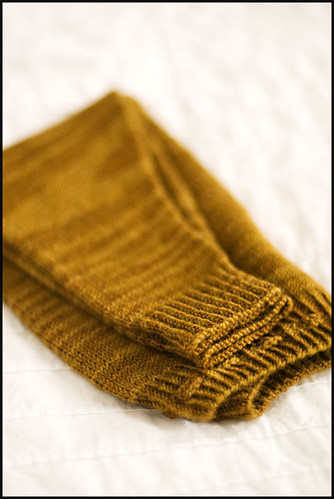
I put the finishing touches on the baby leggings last week and finally got around to shooting them this morning. Oh how I love those rich, golden colors! Seems fitting for those ghostly hints of Fall crispness that are taunting me these days.
Size: 1 Year Old
Amount: 98g -- skating in at just barely under 2 skeins (Pattern Size calls for 3)
Needles: US 3 Circulars
I made a small number of modifications to the pattern. The original is written to be knit flat and seamed up at center front during finishing. That wasn't gonna fly around here, so the first item of business was to convert the pattern to in-the-round knitting, which wasn't hard at all. I didn't change any stitch counts, just ignored the back and forth instructions in favor of joining the end of the row to the beginning and working circularly.
I also opted for twisted stitch ribbing at the waist band and ankle-cuffs - a choice made to achieve a bit more elasticity - a great little perk of knitting things through the back loops. Since babies have stumpy little limbs, I figured the more elasticity the better.
The rest of the pattern is sweet and simple -- sizing for both 6 mos. and 1 year are given. I like to knit the larger sizes so the little growers can wear them longer. Plus, how cute is a 6 month-year-old in oversized baby pants?
The "diaper shaping" as I like to call it incorporates short rows and increases down center back to create an extra pouch-like space for baby 'bulk' (See Above Photo). The cord running through the eyelets at the waist band is crocheted (nice and firm but still elastic due to the nature of this bouncy, bouncy yarn) -- I tied two small knots on either end to keep it from slipping out of the holes.
All in all, a simple pattern with a charming result. You know I'm not a huge fan of The Superwash, but sometimes you gotta do it for the kids (and the parents, too)! And they really do suck up those saturated colors brilliantly, so there's plenty of hypnotic stitching to be had.
8.18.2009
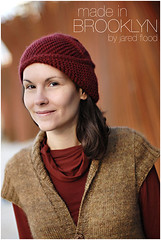
Made in Brooklyn | Accessories

Today we wrap up with a few stragglers from the collection who haven't fit into any other category yet. Both projects make great travel or gift knitting. And while I don't fancy myself an expert crocheter by any means, I thought I'd be crazy and throw something in for fun for the hook-lovers.
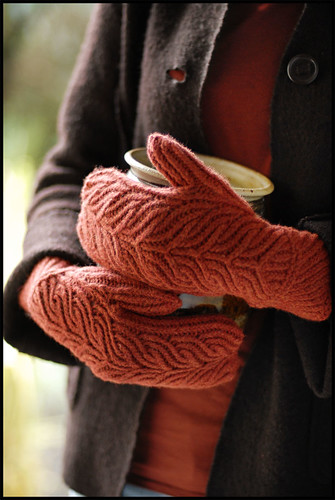
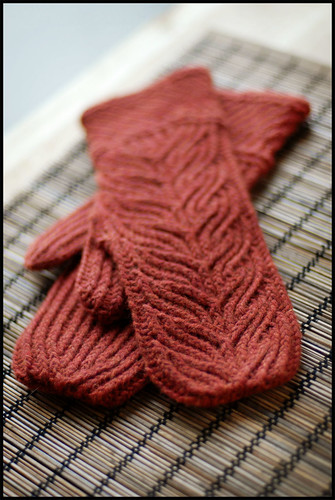
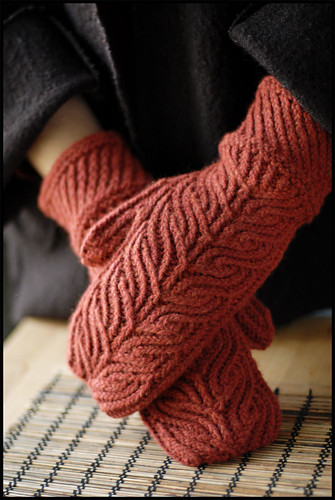
Meet Grove.
These mittens are an ornate little treasure for the hands. I've always loved the relief-like quality of twisted stitch knitting (knitting all knit stitches through the back loops) and how sculptural and graceful they look when used in travelling-stitch and lace patterns.
The interesting thing about the main motif on the tops of the hands is that there is no cabling involved - the motif is formed by yarn overs and twisted knit decreases so I guess technically should be considered lace, albeit a well-disguised version. The cuffs on both hands do utilize traveling stitches in a spiral pattern that is mirror-imaged on either side to add that special detail.
There's something enticing about mitten knitting - maybe the way they remind us of childhood winters, or how they don't really make sense for adults who are constantly in need of finger dexterity (mittens are a great way to drop expensive little electronics down a large flight of stairs - ask me, I know), or that they're just more enjoyable to knit than other things for your hands? Nevertheless, it seems that mitten knitting is alive and well, and that makes me feel all warm and fuzzy inside.
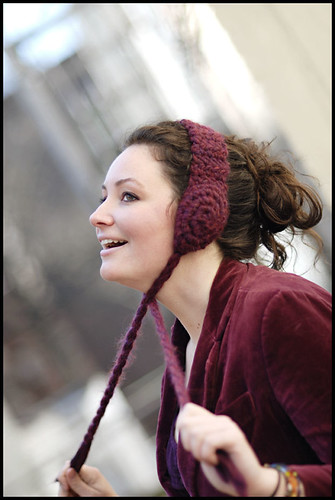
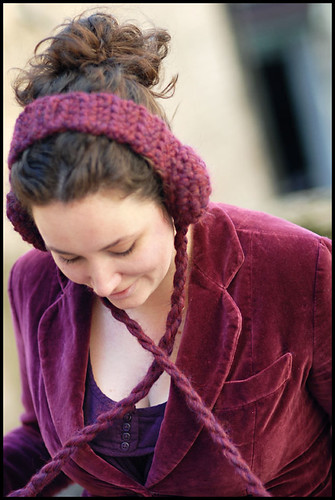
And finally, Metropolitan.
So these. I spent a lot of time staring at a few big, beautiful hanks of Aspen - a super bulky, heathered wool/alpaca blend that comes in a gorgeous array of autumnal colors - thinking What, Oh What am I to do with you? Super bulky presents a funny problem: it's fun to knit for the instant gratification and larger-than-life sculptural quality of your stitches, but not as practical for daily wear because it's, well... super bulky. The other sticking point is that the yardage isn't exactly what you'd call generous - the fiber you could use for thousands of yards of lace schlumps itself into mere double digits in the super-bulky arena.
So my personal design challenge was this: what can you do with one skein (approx. 51 yards) of Aspen that isn't a hat? And as I was mulling this over on my morning commutes to and from school, I found myself marveling at how all of my fellow commuters, while jammed together on a crowded train, were so perfectly isolated from one another by virtue of a fantastic modern wonder that we call Noise Cancelling Headphones. You know, the big, shell-like headphones that make you look like a cool, urban fighter pilot? Do you see where I'm going with this?
Then: the light bulb. Earmuffs! Inspired by these insular electronic devices! Or even, earmuffs to wear over your insular electronic devices! Well, now I was getting a little carried away, but more or less this is how these things came to be.
Metropolitan is a simple crochet project, worked on two different sizes of giant hooks (Huge and Really Huge) for a structural pair of muffs. The ear "shell" is shaped by changing hook size - trust me, I'm not fancy enough to design other means of shaping in crochet with super-bulky yarn - we're keeping it simple.
But the best news about this is that they use just under one skein (including tassels), can be worked in about an hour or less and are perfect for last minute gifts for that person in your life with quirky winter style. And if I can hook it, so can you - trust me.
And with that, we wrap up our official coverage of Made in Brooklyn - I hope you enjoy the collection and thank you already to all of you who have sent such supportive and wonderful e-mails about the work. It is very much appreciated.
In travel news - I'll be headed out to Western Mass this weekend with the trunk show for some teaching workshops. Be sure to stop by WEBS to see the garments in person if you're a local and need a knitting fix!
ETA: If you've been searching for a copy of Made in Brooklyn and haven't been able to find a retailer, you can use CE's "Where to Buy" page to find local shops that stock it here.
The booklet is also available online through CE's website here.
__________________________________________________________________________
RAVELRY LINKS
Grove on Ravelry
Metropolitan on Ravelry
¶ 11:24 AM 47 comments
8.13.2009
Made in Brooklyn | Sweaters for Her
More sweaters today - this time for the ladies!


¶ 10:29 AM 47 comments
OH! Before we get in to that, though, I wanted to remember to mention this: although MiB's sweaters may be written out for men or women, I encourage everyone to experiment! Sometimes the only difference between a men's sweater and a women's sweater is the presence of waist shaping and some simple proportion changes (like yoke depth, arm/body length). If you've fallen for a specific design but it's for the wrong gender, please feel free to use the pattern as a guide: take measurements off of a sweater you love (and whose fit you agree with) and go for it! And with that brief soap-box moment out of the way, I present the sweaters:
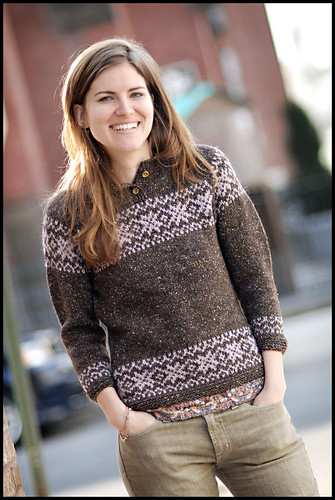
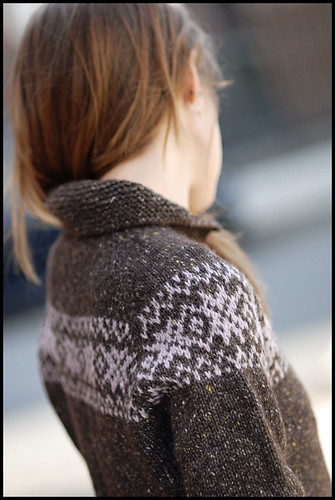
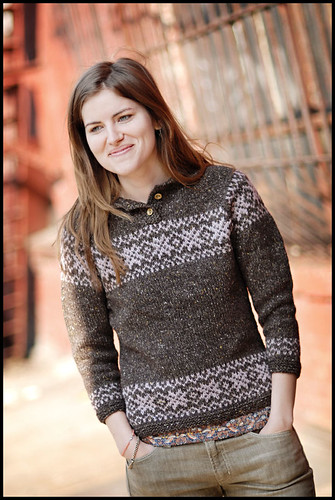
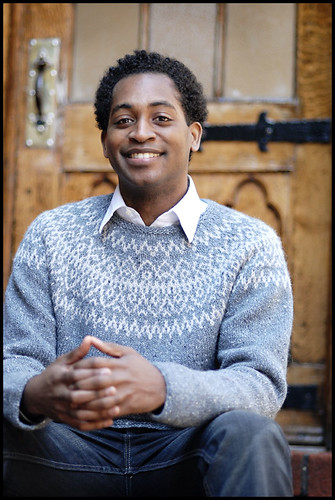
Meet Stilwell.
More colorwork. More tweed. When I first got the colorcard for Portland Tweed, I was playing with a lot of combos and this one kept coming back to me as something I'd like to knit with. A rich, chocolaty brown coupled with a very dusty, subtle, almost grey (my favorite adjectives for almost any color) shade of pink.
It's a good old fashioned seamless raglan ("If it ain't broke, don't fix it" comes to mind) with some colorwork detailing on the yokes and cuffs. I wanted to do a bit of mixing and matching of styles with traditional Norwegian star motifs and more contemporary elements like a fitted body, 3 quarter length sleeves and shaped collar.
The piece is worked with a henley neck as well. For colorwork patterns, I instruct knitters to use one needle size for one-color stockinette portions, and a larger needle size (2 or 3 sizes up, whatever gets you correct gauge) for all colorwork portions. This is necessary to obtain the same stitch gauge between two different fabrics within one garment. Row gauge is significantly different in colorwork, but that's been accounted for in the design, so stitch gauge is the key - in this way the tension in the fabric is kept constant throughout.
I remember knitting a colorwork yoke sweater from a pattern years ago, all with the same needle size, and how the tension change in the yoke drove me crazy. I've since been experimenting with ways of never making that happen again. This works for me! Anyway - I guess what I'm trying to say is, to save time and frustration when knitting projects with both one-color and two-color stockinette portions, find what gets you the same stitch gauge for each and use those two needle sizes for best results.
Tangents! Tangents! Ahem.
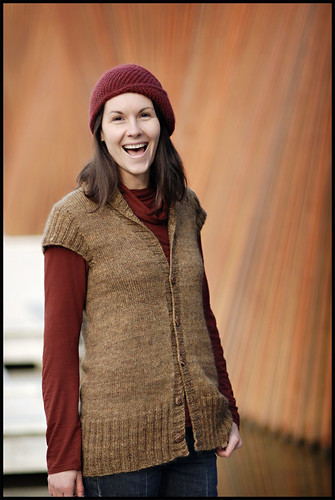
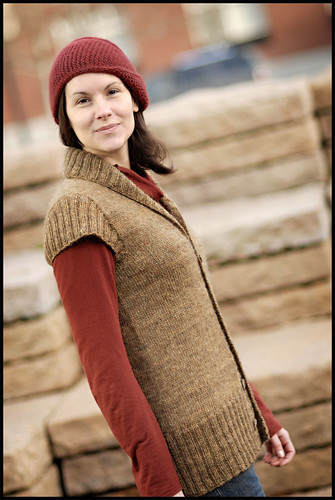
Meet Redhook.
One of the reasons I love Fall so much is the prevalence of layering. People are rocking the layered look everywhere you look and that makes for interesting and inspiring style, not to mention a good way to mix up a wardrobe that can start to feel reeeeaally boring after all those stifling summer months of wearing one thing at a time. Layering is all about contrast: long and short garments, fabric weights and warmths, and maybe most importantly, color! So with all of that in mind, Redhook was conceived as a fun monkey wrench to throw into your layering mix. Vests in general are great for this type of thing because they can be worn under outerwear with no bulk at the arms, and less overheating.
I wanted a garment that could be worn as a stand-alone, or layered easily, had a simple shape and a couple of nice details - like a luxurious collar! I can't get enough of those.
I also fell in love with this color. Moorland is a single-ply heathered yarn that comes in a wonderful group of earthtones (very, very hard to make color decisions on this one). The thing that really floored me about the yarn was the drape after washing - it got super silky and smooth, and very much took me by surprise after I picked it up off the blocking board (who am I kidding, the carpet of a guest room in Portland, Oregon). It was warm and light, and even more perfect for pairing with other clothes. Bonus points!
Redhook involves lots of fun with short-rows. Both sleeve caps and shawl collar/buttonband are all worked directly off of the body fabric from picked-up sts and shaped with short rows.
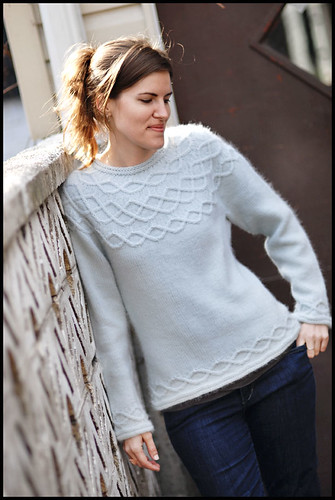
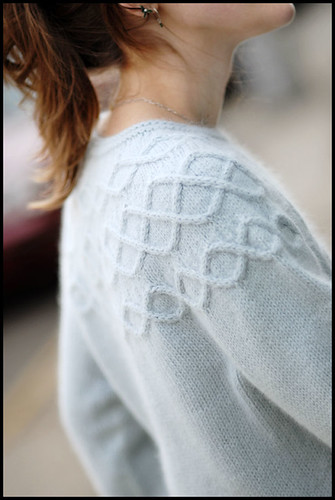
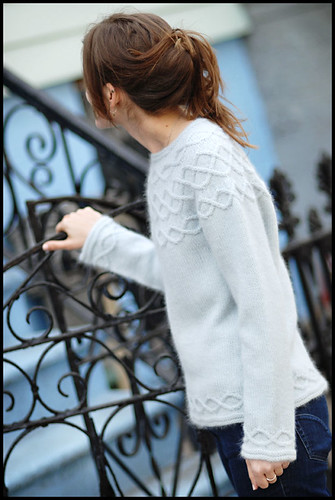
And finally, Seneca.
Sometimes, scratch that, most times, design ideas hit you at the oddest times. Like when you're sitting, twitching, in jury duty (which makes it even more unbearable, as you're already thinking about how much you'd rather be at home knitting). I had been wanting to knit a rounded yoke pullover with cables that weren't vertical, and desperately wanted to keep it all in one piece. I had been chewing on that idea until BAM! Jury duty brought me to sideways cables.
Sideways cables are interesting - if you've never worked them, here's how they roll: They seem as if to appear out of nowhere on a stockinette or reverse stockinette background. This occurs by a severe increase, usually 5 stitches into one and working the cable directly from that point. When the cable is done, you use a fancy 5-to-1 decrease and you're back to your stockinette fabric. They're like little intermissions from your mindless stockinette meditation.
AND - they perfectly suit round yoke sweaters, which are shaped with intermittent decrease rings throughout the yoke - in Seneca, they're stashed between cable motifs, so that the stitch counts are never interrupted when cabling, which is a major sigh of relief.
A note before I forget about this one: Because of the rather dramatic nature of the fabric manipulation - the severe increasing for the cables and severe decreasing for the round yoke - you'll definitely want to do an official blocking job (I really recommend full-immersion for this) to smooth all of that out after completion. Sweater fabric always looks better after this process, (always) but this sweater benefits from it especially.
Sidways cables are also thrown in on the cuffs for a little extra interest and weight there. Because the sweater is a worsted weight fabric, I generally advise about 3-5" of ease for a classic fit. My model was about 5-6" smaller than the garment and liked the cozy feeling of a little ease added in. I'm a big fan of a little room in my sweaters, especially in warmer fibers like angora.
That rounds out the sweater portion of this tour. Stay tuned for the last two stragglers from the booklet in the next couple of days.
____________________________________________
RAVELRY Links
Stilwell on Ravelry
Redhook on Ravelry
Seneca on Ravelry (Also available as an individual PDF download)
8.10.2009
Made in Brooklyn | Sweaters for Him
Well it's about time we got some sweater talk here, no? Seems like it's been forever! Today's sweaters are two near and dear to me -- probably because I love wearing them both so much.
So I'll state the obvious: I am in love with colorwork. I can't not do it. It's a compulsion. I love graphic motifs and patterns and pairing yarn colors. The sheer amount of possibilities makes my head swim. So I decided early on to just go with that and indulge the colorwork factor this year, and these two pieces pulled me right back into that vortex.
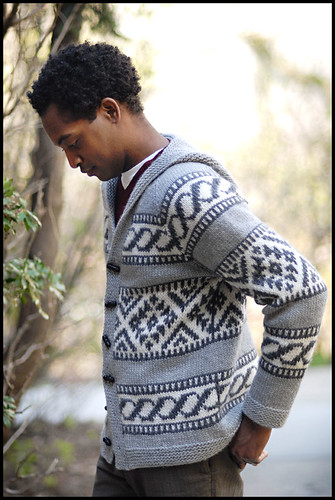
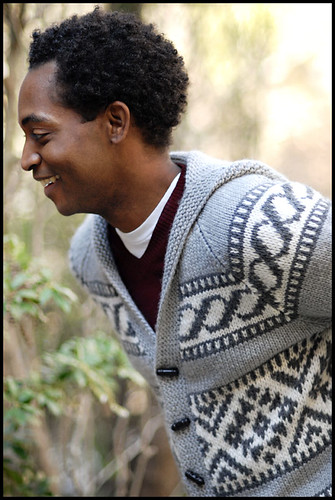
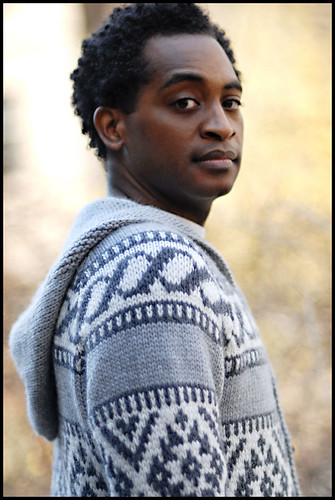
Meet Rockaway.
Indulgent indeed! This is one of those epic patterns I catch myself daydreaming about on the subway but rarely realize. It started out as an oft and intense wish for a classic Cowichan Cardigan -- traditional bulky wool sweaters featuring animal and geometric patterns, knit by the Cowichan Tribes of the Pacific NW and Western Canada. Traditional Cowichan patterns are worked with thick, bulky wool and often sport dramatic shawl collars worked in garter stitch (sounds good right?) - here are some examples.
I made some changes to my inspiration but would be lying if I told you that this design didn't come directly out of this sweater genre! Ariosa is a chunky merino/cashmere single, very lightly spun (almost roving-like) which keeps this cardigan from becoming too heavy. It's oddly soft for something that looks more like rustic outerwear. I traded a shawl collar for a hood, cause you know, hooded cardigans are always welcome here.
As for the knitting - the sweater is steeked (cut) down the middle to open up the front, which means all this colorwork patterning is knit in the ROUND (intoxicating!) - if you were worried about working stranded colorwork from the wrong side, rest assured we'll be having none of that around here.
I did a machine-sewn steek rather than my usual crochet method, because merino and cashmere are short-stapled, slippery fibers and need to be well enforced to really stay put. Actually, this was the first time I had ever worked a steek with a sewing machine. I guess it's not so terrible after all (despite my still-strong fear of bringing machines close to my unfinished knitting - although I do remember thinking at the time that the hammering needle resembled a small battering ram).
In my finishing frenzy I forgot to snap some photos of the inside, but will be sure to do that when the garments stop travelling and return to Brooklyn, later in the winter.
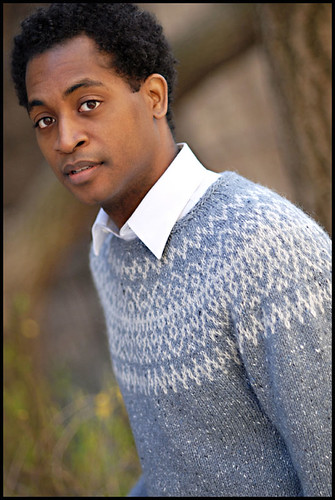
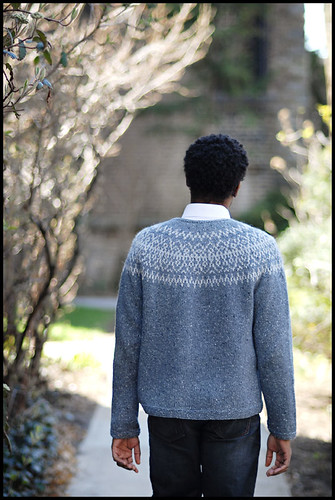
And, Huron.
There's a funny story about this one. Prior to giving an official name to this sweater I was referring to it as the Pinch Hit. See, there was another sweater slated for this book, back when Huron was a mere scribble in a notebook somewhere. The other garment just wasn't working for me - it didn't feel right and it didn't fit in, and time was running very short. With 8 days left before my deadline, and an unflappable feeling of defiance ("I won't lose to you, Problem-Sweater!") I thought throwing in another, completely new, completely unworked-out sweater design was somehow a good idea. In retrospect, I'm glad I did, but... that was a rough week. Aside from calling up CE for a last minute shot of yarn, I don't remember much from that period, other than that Huron was born from start to finish in about 6 days.
But I guess when you're knitting yourself silly on a garment deadline, you can't ask for something much better than a seamless stockinette pullover with a colorwork yoke. Just when I thought I couldn't take any more stockinette (something I almost never say), the stranded portion swoops in and saves the day.
Live and learn I guess. The funny things is, I wouldn't mind knitting this again. I didn't feel like I really got to enjoy the knitting to its fullest because of said insane-situation (kinda like inhaling a gourmet meal way too fast to enjoy it). Round yokes are hard to beat on my list of favorite project types.
Anyway - it's here, nonetheless, which is what really matters I guess. As for the other, sidelined sweater, it'll have its time in the sun. Someday. Just not today.
And speaking of sweaters, there will be more sweater profiling (for the lady-folk) appearing here shortly!
__________________________________________
Ravelry Links:
Rockaway on Ravelry
Huron on Ravelry
¶ 3:19 PM 39 comments
8.08.2009
Made in Brooklyn | The Laces
Continuing on with the projects - today we look at The Laces! These are some of my favorites. There are two lace patterns included in the collection - one requiring a modest commitment, the other one requiring the Long Haul labor-of-love.

¶ 3:35 PM 32 comments
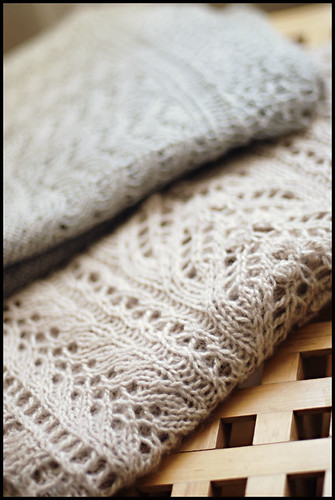
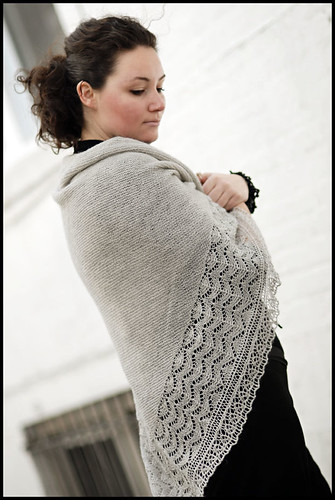
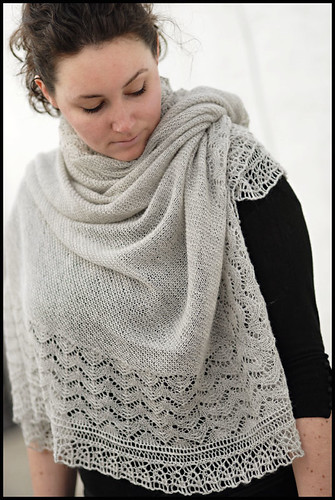
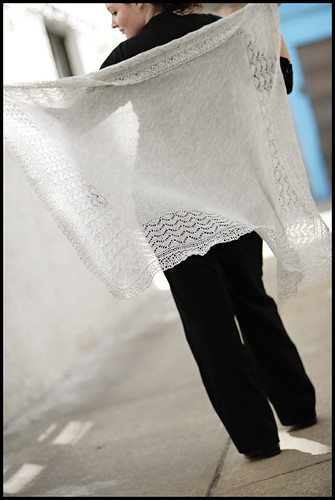
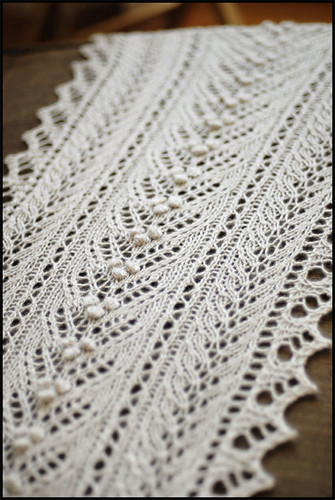
Meet Bridgewater.
A large lace square worked in a laceweight alpaca silk 2-ply - this was the first project I started last Fall and one of the final finishes in the Spring. Don't get me wrong though - we had many, many happy hours together.
Although I generally favor working lace projects with slightly heavier yarns that have a bit of body to them (mostly cause I like watching the architecture of the stitches play out as I work), there's really nothing like a fine laceweight shawl after it's blocked. Fine knitted lace has a way of taking your breath away when it's whisping around!
The piece is a perfect square, with the center garter stitch portion (okay, so I guess I got a little more garter in than I may have originally let on) worked first, back and forth with lots of satisfying, mindless knitting. Just when you're ready to ditch the simple stuff you'll work the second section of horseshoe lace, picked up from the square's perimeter and worked in the round, working increases at each of four corners. The delicate edging is worked last and knitted-on in place of a bind off.
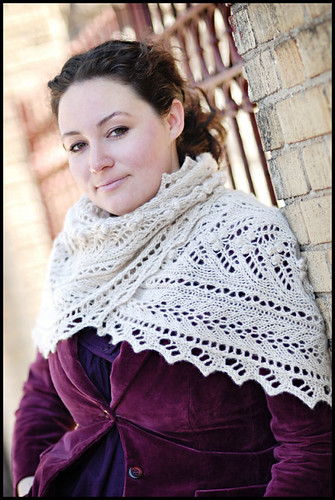
And, Willoughby.
Here we have our DK-weight lace contender. This piece is a true bit of luxury knitting. Marly, an incredibly light (even for cashmere) 100% cashmere will stop you in your tracks the first time you touch it. When blocked for lace, it feels even lighter - I couldn't believe it!
The pattern provides two sizes - an average length (about 60") and a long length (72") depending on how much yarn you'd like to use. The final piece is wide enough to be considered a stole but can be scrunched down to be worn as a scarf just as easily. I love lace pieces that can be dressed down for street styling or classed up with evening wear. Versatility is always a plus!
The stole is worked in two halves - starting in the center with a provisional cast-on and worked out towards the edges. The lace edging is worked concurrently and changes direction at finish to be worked as a knitted-on-edging in place of a bind off. The second half is worked directly off of the provisionally cast-on sts at center and worked outward in the exact same manner as the first.
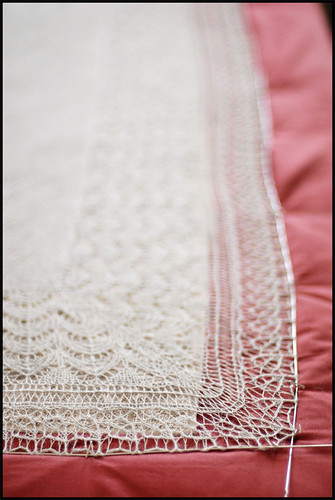
As a side note - I want to take this opportunity to extol the virtues of blocking wires. I've been using them exclusively for a few years and have to say that they reign as one of my very favorite (and necessary) knitting tools. I'm a big believer in the magic of blocking - not only for lace, but everything - it can really be the key to putting that extra professional touch to your work. That said, I like square edges, sharp corners and even tension - which can be achieved with pins, but you may drive yourself nuts trying if you err on the side of perfectionism (neurosis) *cough*.
Blocking wires do all the hard work and leave your lace projects coming out perfectly crisp and symmetrical. The joy!
I'll leave you with this photo - taken in early Spring as I was communing with camera, blocking wires and at-long-last-finished-shawl.
Lace knitters - I hope you enjoy!
_____________________________________________________
RAVELRY LINKS:
Bridgewater on Ravelry
Willoughby on Ravelry (also available as an individual PDF download)