Materials: Noro Silk Garden; 45 silk | 45 kid mohair | 10 lambswool
Amount: 4 balls in total in Shades 201 (2 balls), 234, and 86; Approx. 440yds/200g
Needles: US 7/4.5 mm KnitPicks Options
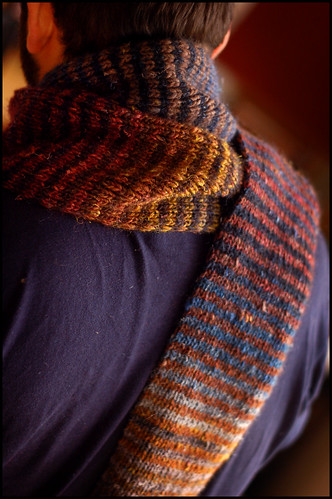
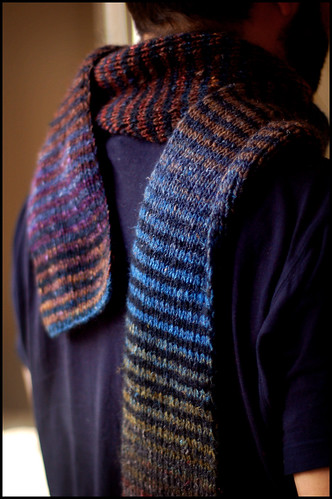
Dimensions: Approximately 5.5 inches in width and just over 6 feet in length, unblocked
Start Date: 6 April 2007
Finish Date: 25 April 2007
Manually striping Noro is a classic trick done by many a knitter before me - just check out all the beauties over on Flickr. I admit to spending a good amount of time appreciating all the interesting variations on the same theme for quite some time before taking the plunge myself. For full disclosure, this one sent me over the edge.

I've gotten a lot of e-mails about this scarf so I thought I'd throw out all the details - if it's too much for you, feel free to gloss over this section and rest your eyes on the hypnotic color changes. Noro is good like that.
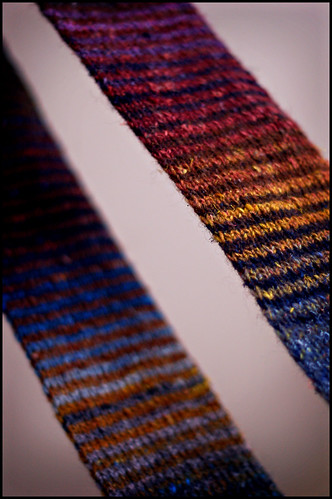
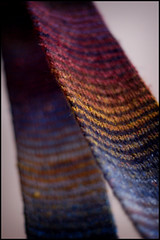
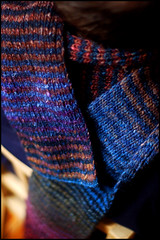
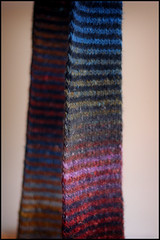
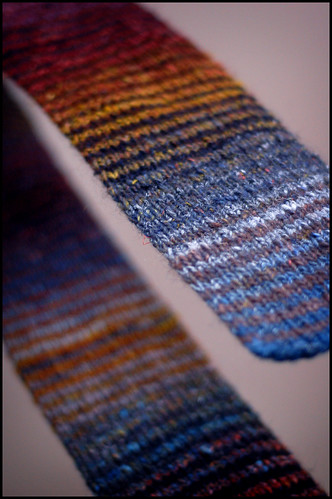
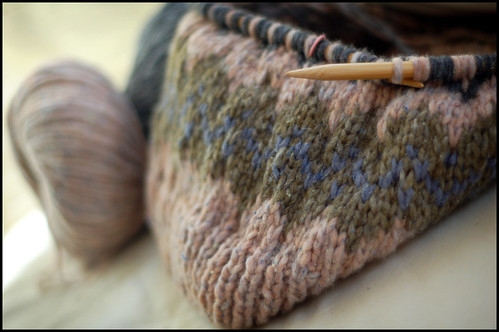
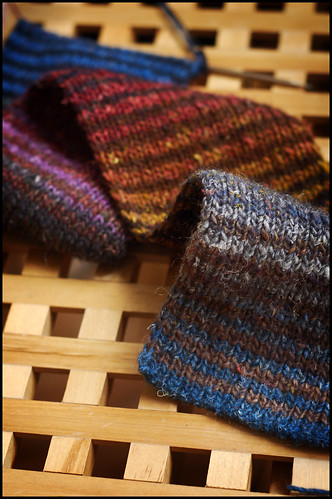
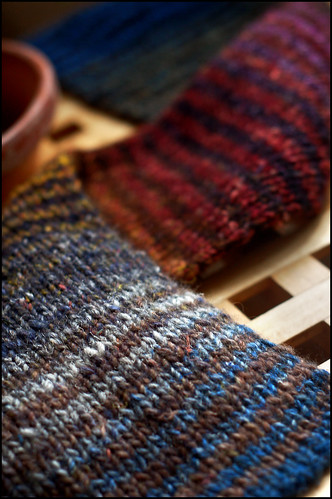
The scarf is worked over an odd number of stitches in 1x1 ribbing which, in my opinion has two big benefits: the scarf is reversible and behaves very well (no curling) while also plumping up into a thick fabric that will look suspiciously like stockinette if you leave it unblocked. I cast on 39 stitches using US7/4.5mm needles to get a width of about 5.5 inches. On scarves of this nature I prefer to work a slipped stitch edging which adds a nice, polished touch and perfectly hides the working yarn as you carry it up the sides whilst striping to your heart's content. I worked two-row stripes using two different colorways of Silk Garden, slipping (purlwise) the first and last stitch on the second row of every stripe.
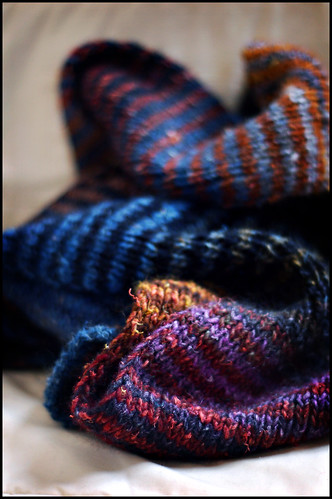
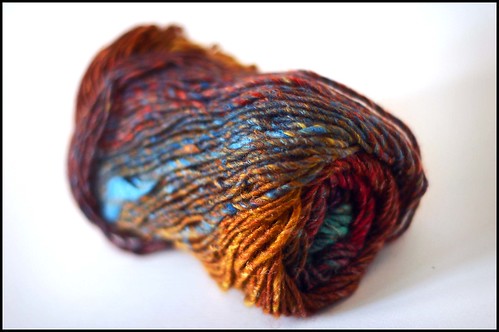
Colorways: I can appreciate all the amazing colors that Noro hits out of the ballpark, but in general wouldn't wear most of them. They're pretty bold. Lucky for me, Noro makes a few colorways that are toned down a bit but retain their luscious, tasteful, saturated quality that the knitter in me is drawn to. Not to mention the texture, which will slay me every time.
I used a total of 4 balls of Silk Garden (which will land this scarf in the $40-45 price range if you buy full price retail. A bit pricey for a scarf but ... so ... beautiful... ) in three different shades.
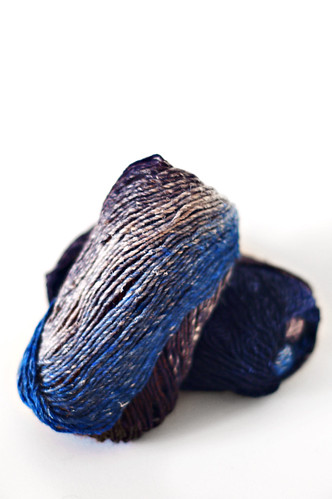
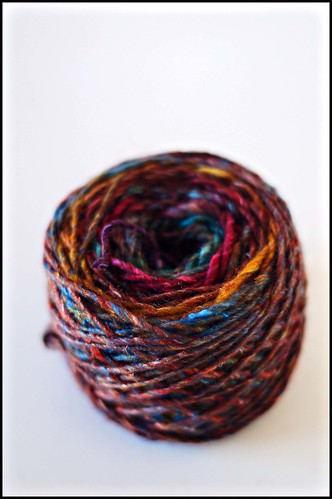
Two of the four balls of yarn I used were shade #201 which is a nice mix of deep blue-blacks, marine blues, silvery greys with a little purple shock thrown in to keep things interesting. See them pre-knitting here. I striped 201 throughout the entire length of the scarf with Silk Garden #234 and #86, two colorways that to me are rather similar. Main colors in both are understated and elegant crimsons, golds and blues, with lots of cool and warm grey tones in between. In their current configuration you can scarcely tell that they're from two different color families. Pre-knitted cakes of 234 here and 86 here.
I'm not sure there's much else to say about the knitting - it feels a little like cheating working such an easy, mindless process and ending up with such a stunning result. The benefits of a quality fiber (and dye job) have never been more apparent.

With spring upon us and summer approaching, I'll take what few opportunities I can to throw this thing on, but for the next couple of months I'm happy to call it wall-art in my apartment.
Happy Monday, one and all.
¶ 11:50 AM 136 comments
So I've thrown open all the windows and spent the week enjoying sunlight and the fresh smelling air and zoning out on some mindless knitting. Night after night its been stripe after stripe of Noro and you know what? It's been wonderful. I'm finishing up my fourth ball of yarn and I'm still happy watching the colors change both inside (in my knitting) and outside (spring!). Not to mention the million-dollar light that has been pouring in through the windows every afternoon.
In many cases I'd consider this a knitting lull, but it isn't. When I need something more than meditative, I've got my new sweater at the ready, although that too is growing organically and without hurry.
The sweater you see here is (the start of) Scott from RYC Classic Winter. The pattern is pretty fussy, in my opinion, so I'm making some pretty broad simplifications (mine will be completely seamless, and as a result, so much less stressful). Some super-soft, chunky colorwork in nice muted colors is just what the doctor ordered for relaxing window-side on the couch. And for the record, the yarn is as light as air.
I'm sure it's just a matter of time before the intensity will kick back up again, but for now I'm gonna zen-out with my needles and relax. Have a great weekend. ¶ 10:09 AM 34 comments
And in the wake of a complete project of such substantial measure, I've been floundering a bit. I'm stuck with a pesky urge to be immediately immersed in the process of something deep and engaging again, while at the same time feeling semi brain dead, busy (tired) and unable to muster the energy or time to assemble a cohesive plan for the next big thing.
Neither of these factors, however, offers a cure to my ever-itchy fingers, and instead of doing the obvious - hitting the works in progress pile - I've turned to another solution. Noro.
The texture. The color. The fiber. The brilliant tendency towards hypnosis. (The Knit Happens sale that changed my life.) All things working in my favor right now as I just sorta need my knitting to entertain me for a bit while I regroup.
Now, I've never been one for Noro, and I've definitely never been wild about self striping. I actually bought the yarn with more of an intent to photograph it and appreciate it visually, because really, it stands alone as something beautiful, even unknit. But if the online knitting community is capable of consistently doing one thing for me, it's chainging (without fail) my perception about things I didn't think I liked. (Can you believe there was a period in my life where I didn't like cables? Granted that was a long time ago, but still.)
Regardless of your preferences towards Noro, or self striping in general, no one can argue with the fact that this yarn is a veritable feast for the eyes. I've photographed my modest Noro horde and have many a cake sitting around the apartment making things a little more easy on the eyes. Click the photo below to see a bunch of pictures of my new yarn from Japan.
And despite all my complaining about lack of a substantial project... I guess I'm not being completely honest. I kind of started a sweater last night. It's from a pattern, so it is also functioning as a relaxation knit. I really just can't keep the sweaters off the needles... oy.
¶ 10:17 AM 60 comments
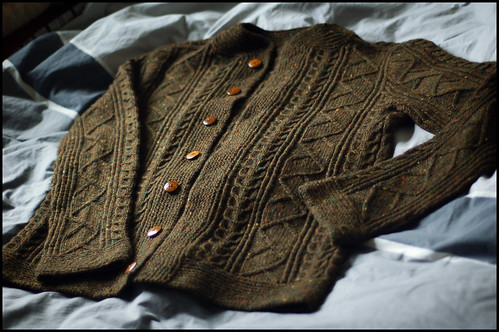
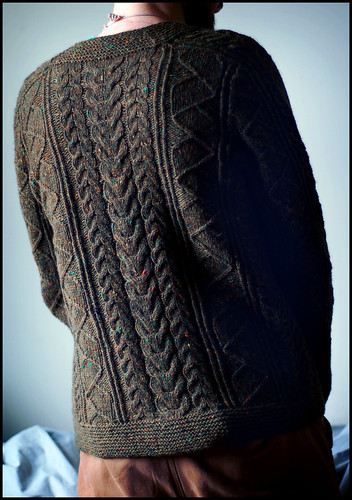
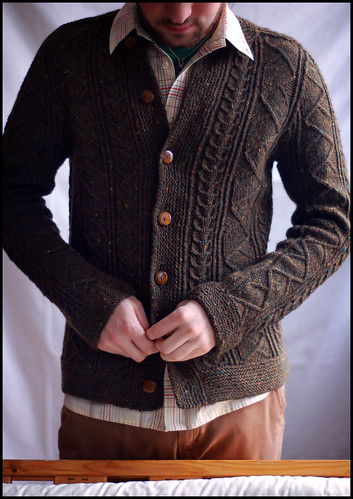
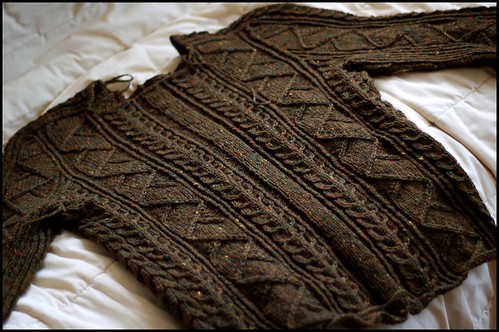
Well it has indeed been an eventful month on my needles. I must say that this has positively been the most exclusive I think I've ever been with my knitting. In retrospect I think that is probably the result of a rare combination of things: just the right balance of freedom and interest from the pattern, an available amount of time for some serious knitting (a luxury!) and a heavy love for the wool involved. Either way, here she is, already for you...
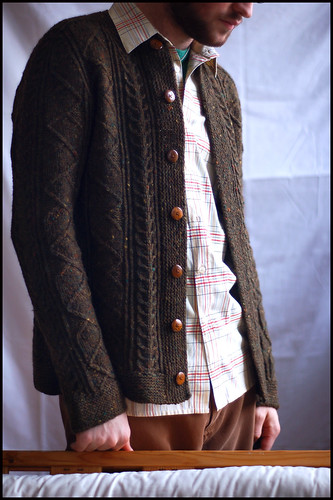
Pattern: Saddle Shoulder Aran Cardigan by Elizabeth Zimmermann/Meg Swansen
Source: Wool Gathering #63 (School House Press)
Materials: Classic Elite Skye Tweed in Spruce Green/1215.
Amount: Twelve and a half 50gm balls. Approximately 550 gms/1300 yards worsted weight
Needles: US8 Circular 32" Addi Turbos. US 7 for sleeve cuffs and garter band at base of sweater
Start Date: 10 March 2007
Finish Date: 9 April 2007
Modifications: When it comes to knitting with Elizabeth Zimmermann, I guess everything is a modification in some sense. Although I guess the word 'modification' implies the presences of a fixed starting point, which we don't have here in Wool Gathering. What we do have, though i a few pages of solid good sense and enough structural advice to get your creative juices flowing.
At the base of this pattern is, of course, EZ's seamless recipe for a saddle shoulder pullover. I've worked many a Zimmermann seamless, but this is the first time I've conquered an official Saddle-Shoulder in its pure form. The fit alone has made me a believer - its a perfect match for those square-shouldered lanky types... ahem.
Of course, it's more than your simple seamless saddle, with a spattering of many a beautiful cable panel and the excitement of that steek - all things that intrigued me to the very end.
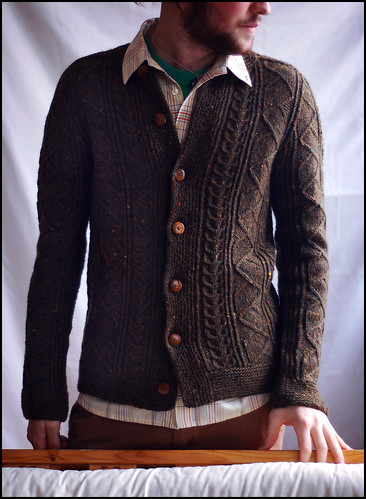
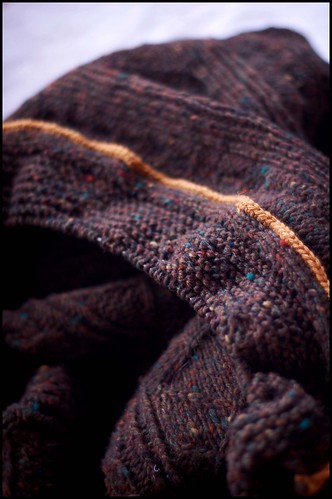
I primarily stuck with the cable advice suggested in the pattern - the Sheepsfold Cables (the ribbon-like traveling stitch panel) and the Fishbone Cables are such classic EZ features that I couldn't resist. Not to mention all the garter. Garter glutton here, and proud to admit it. As for the back panel, it's a slight modification that I ripped off from the magnificent Na Craga pattern by Alice Starmore (the combination of these two knitting gurus was enough to make me all aflutter in the designing stages, it's true). It's a basic horseshoe cable ascending up the center with smaller horseshoe cables mirrored on either side and facing the opposite vertical direction. I really love how it turned out (see below). The underarm panels are a combination of the fishbone and the smaller horseshoe. All these panels together with a bunch of twisted stitch (ktbl) dividers strewn about came together in a great way.
A word on the construction sequence: I did your standard formula of body first, two sleeves, unite at underarms and shape yoke until bind off at collar. The Saddle Shoulder formula leaves a rather square-ish neck, I played this down a bit by shaping the back neck with shortrows. This was totally a freeform operation but did serve well to raise the back neck an inch or so, which was exactly what I needed. After I had the major part of knitting out of the way, I wet blocked the whole thing then cut it into its cardigan form (and rambled non-stop about it. Just check my March archives). After all this I went back and picked up stitches along the base of the sweater with a smaller needle (US7) and worked a 2 inch garter stitch band. Rather than start with this way back at the beginning of the sweater, I liked the idea of picking up stitches after blocking (also I was slightly worried about running out of yarn. The garter stitch base was an option I kept open for that reason). Finally, I worked the button band and collar altogether in garter stitch, mitering the corners at the neck. I wet blocked again just for posterity before sewing the buttons on. To answer some of your questions about the facings - I do plan on sewing them down, solely for the sake of a thorough finish, although I haven't done so yet. The photos you see here feature unsewn facings (not pictured, as they're on the inside of the piece).
I really dig doing the buttonband this way. I like changing things up a little with a vertical garter stitch band, and its integration with the collar I think also is a unique quality. Working the buttonband vertically also makes it possible to place the buttonholes exactly where they should go, evenly spaced and all, since you know exactly how many total stitches there are from the very first row. Speaking of buttonholes, have you ever tried EZ's one-row buttonhole (explained in KA and KwoT, and I'm sure others)? This is my first time using this method and I'm completely sold. It's brilliant! (Are you surprised, though? really?)
In closing, I felt I should mention that the completion of this sweater has been met with such a mixed bag of feelings for me. Accomplishment and satisfaction surely are first and foremost... but to be honest I sort of feel like someone died. This is the unfortunate curse that plagues the process knitters of the world I guess - but I am acutely aware of the absence of this sweater in my day-to-day routine now. At this point, on such an involved project I would usually be shouting to the hills in excitement for the freedom to move on. There's some sort of postpartum wool withdrawal happening. I guess when you're really in the zone with Elizabeth and Meg, this is par for the course.
I guess all I can do is go back to the source... give me some more of the good stuff, Liz!
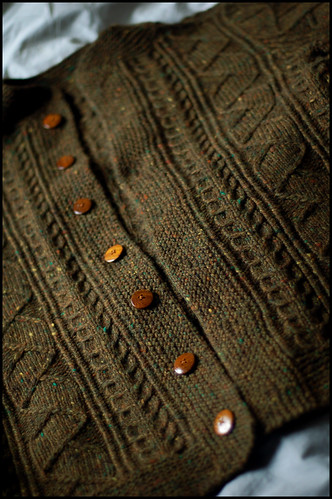
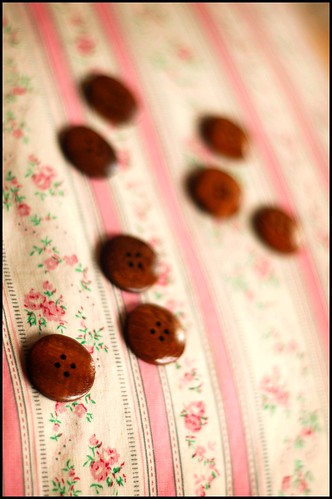
I picked up some buttons the other day that I thought fit nicely - I wanted a simple and natural warm wood button that would seem right at home nestled amongst all that tweed.
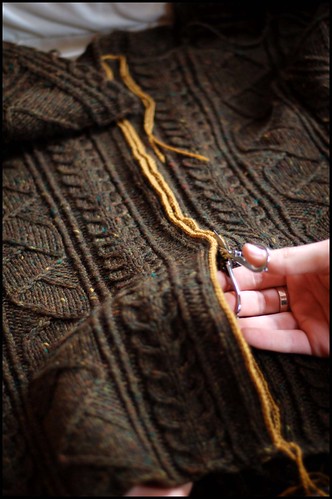
I also wanted to show you one more picture of the button band in progress. The finished button band is about an inch and a half of garter stitch. This picture was taken after knitting several rows up from the pick-up stitches that I showed you in my last post.
We're looking at the wrong side of the work here - see how the facing is playing nice and laying itself flat on the inside of the sweater? I like that very much.
I'll do my best to orchestrate a proper photo shoot over the weekend (this sweater sure deserves one!). And starting today you should know that I will be effectively living in the sweater until the identity crisis that the weather has been having is officially over.
¶ 10:02 AM 36 comments
To be honest, I especially wanted to cover what happens after the cutting, because for me this has always been the part of steeking that was unclear. I completely understood the hows and whys of the cutting portion, but beyond that the steps to complete the route to 'finished sweater' have always been a grey area for me.
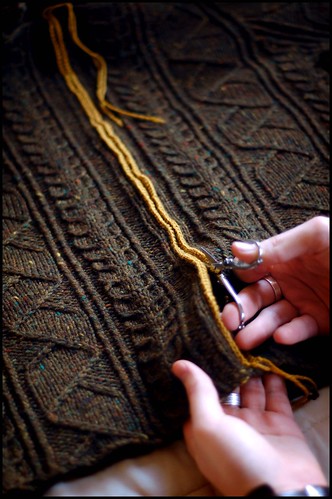
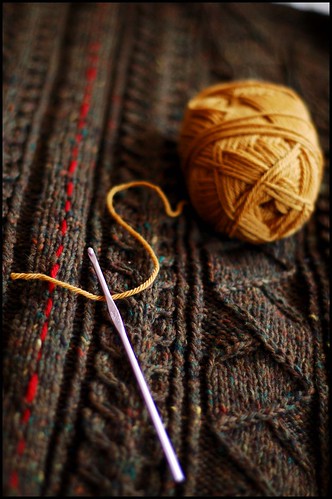
After the cutting you'll have two stockinette 'flaps' that need to be dealt with on either side of the cardigan opening. Again, the yellow wool acts as a good indicator where these flaps are on my sweater. The final step is to pick up stitches along these borders and work the button band. Depending on how many stitches you left for your steek, the width of your flaps (or "facings" as they are more correctly titled) will vary - my faccings are 3 stitches: 2 knits and 1 purl along each side of the cut. So then, we can now begin picking up the buttonband like so:

I love EZ's sensible formula for picking up stitches along a vertical edge. Instead of calculating your own stitch gauge vs. row gauge and doing all that unnecessary calculating, her trusty 2 to 3 ratio works in virtually all cases. That is, pick up 2 buttonband stitches for every 3 rows of knitting on the sweater body. This is the reason you see the stitches on my needle in pairs of two. Its a perfect ratio that is giving me a flat and even buttonband.
Once the necessary number of stitches have been picked up, knit back and forth until the bands are as wide as you need them to be, throwing buttonholes in on whatever row marks the halfway point. Simple as that.
As for the flaps/facings, they'll fold back naturally onto the wrong side of the fabric and behave nicely once all is said and done. I'll give mine a light steam with an iron to flatten them a bit more and to lessen bulk, but not much more than that is needed.
I'll probably post one more photo this week showing you how the steek is behaving once I have a more substantial amount of buttonband knitting done. All that's left is finding a few buttons that fit this beast. We're so very close to the finish!
I hope everyone had a great holiday weekend. ¶ 12:45 PM 27 comments
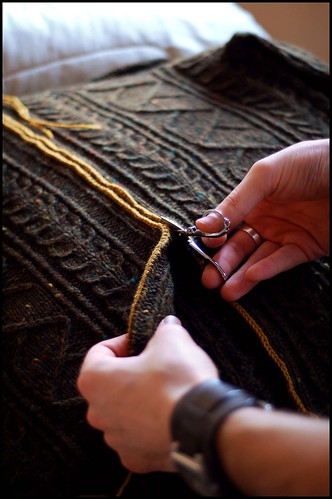
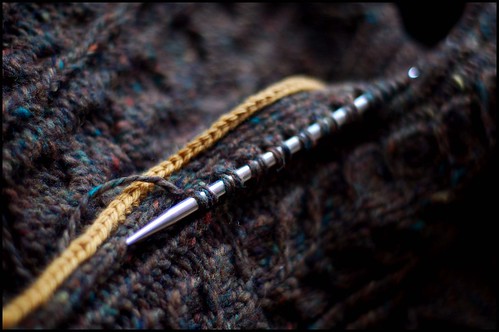
Today I'm tackling the reinforcement portion of steeking. There are a few ways of reinforcing your steek, the easiest way works only for the stickiest of wools and actually requires no reinforcement at all. If you have a super hairy and sticky yarn, when you make the cut, the wool works like a champ reinforcing itself. This isn't the case for me so I'm gonna need the help of some 3rd party wool. The second method is the machine steek, probably most common with those of us prone to paranoia. It's hard to argue with a reinforcement that's hammered in by your sewing machine. For me though, sewing machines and knitting don't mix so well intuitively (something about a machine harshly pounding into my carefully handcrafted fabric... not to mention a lamentable loss of elasticity). For this sweater, I went with the third method which utilizes crochet chains to reinforce the knitting. This method is loads of fun for those of you who like the technical stuff. You know I love it!
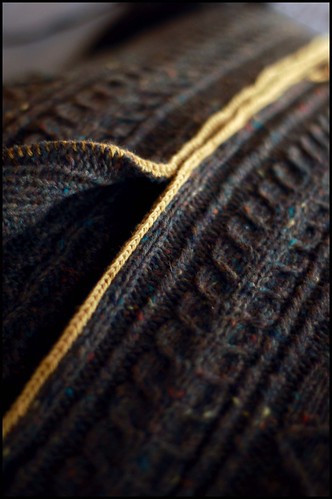
First and most important, we must be absolutely sure to use an animal fiber (preferably a 'sticky' one, wool as always is perfect) in a lighter weight than your sweater for the crocheting. I used KnitPicks Telemark, a sport weight wool intended for colorwork, in a mustardy yellow. I decided to use a yarn in a different color to make the process more clear visually (for both you and me) while also adding an interesting accent on the interior of the finished work. Remember that the 5-stitch stockinette area reserved for the steek (including the crochet chains) will be folded in onto the wrong side of the garment after finishing, hiding the yellow chains from view while wearing.
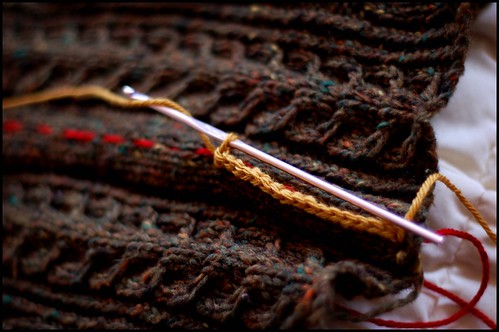
motor up one side

and back down the other
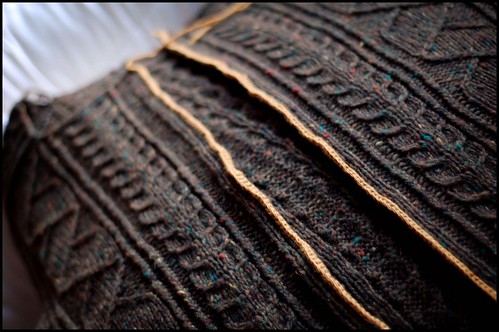
The completed reinforcements look something like this:
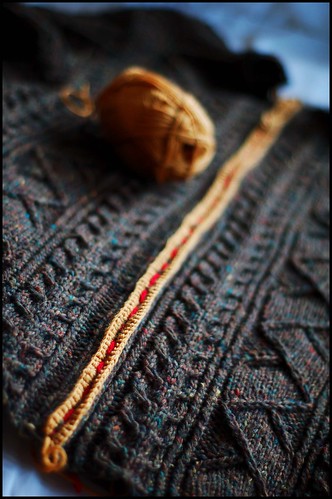
Notice how nice and neat the red line is framed by the yellow chains. We're now ready to pull out the red wool to reveal a nice tidy ladder of stitches that is just begging to be cut.
There's nothing left to do but ready the shears. Stay tuned.
¶ 10:50 AM 28 comments
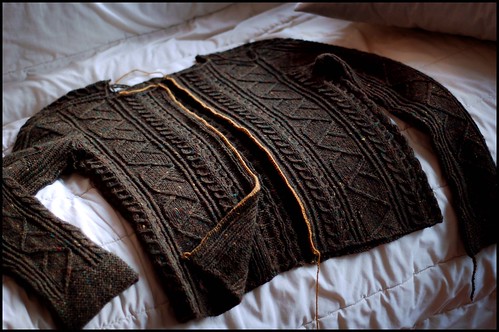
The 5-stitch stockinette panel you see running down the center of the soon-to-be-cardigan is where I'll be doing the cutting (The actual 'cut-line' is scored in the photo below with the dotted line of red wool). After that, I'll just need to add the button bands and the collar. Oh how I love the seamless.
For now, though, it's time to start reinforcing for the cut!
¶ 1:07 PM 68 comments

