4.04.2007
Send For Reinforcements
Many of you have asked if I'd walk through the steeking process as I go here. I'm more than happy to document the process with my camera, but I won't be posting a detailed tutorial. I have decided against a tutorial mostly because there are already some wonderfully comprehensive and accessible ones available for us online that I don't feel need any ammending (I used Eunny's). Feel free, though, to use my posts about steeking as a supplement for other online tutorials. After all, when it comes to cutting your knitting, there's really no such thing as an excess of clear examples showing how this technique actually works (really it does!). I hope this will be another.
Today I'm tackling the reinforcement portion of steeking. There are a few ways of reinforcing your steek, the easiest way works only for the stickiest of wools and actually requires no reinforcement at all. If you have a super hairy and sticky yarn, when you make the cut, the wool works like a champ reinforcing itself. This isn't the case for me so I'm gonna need the help of some 3rd party wool. The second method is the machine steek, probably most common with those of us prone to paranoia. It's hard to argue with a reinforcement that's hammered in by your sewing machine. For me though, sewing machines and knitting don't mix so well intuitively (something about a machine harshly pounding into my carefully handcrafted fabric... not to mention a lamentable loss of elasticity). For this sweater, I went with the third method which utilizes crochet chains to reinforce the knitting. This method is loads of fun for those of you who like the technical stuff. You know I love it!
First and most important, we must be absolutely sure to use an animal fiber (preferably a 'sticky' one, wool as always is perfect) in a lighter weight than your sweater for the crocheting. I used KnitPicks Telemark, a sport weight wool intended for colorwork, in a mustardy yellow. I decided to use a yarn in a different color to make the process more clear visually (for both you and me) while also adding an interesting accent on the interior of the finished work. Remember that the 5-stitch stockinette area reserved for the steek (including the crochet chains) will be folded in onto the wrong side of the garment after finishing, hiding the yellow chains from view while wearing.
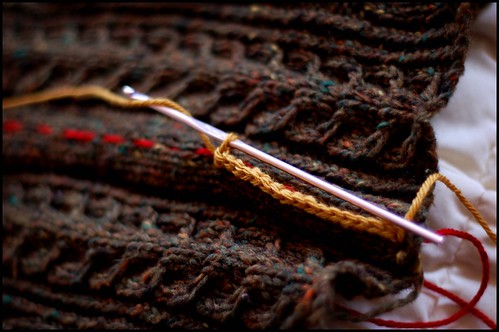
motor up one side

and back down the other
The completed reinforcements look something like this:
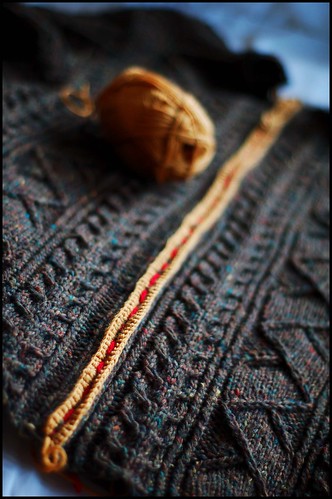
Notice how nice and neat the red line is framed by the yellow chains. We're now ready to pull out the red wool to reveal a nice tidy ladder of stitches that is just begging to be cut.
There's nothing left to do but ready the shears. Stay tuned.
¶ 10:50 AM
Today I'm tackling the reinforcement portion of steeking. There are a few ways of reinforcing your steek, the easiest way works only for the stickiest of wools and actually requires no reinforcement at all. If you have a super hairy and sticky yarn, when you make the cut, the wool works like a champ reinforcing itself. This isn't the case for me so I'm gonna need the help of some 3rd party wool. The second method is the machine steek, probably most common with those of us prone to paranoia. It's hard to argue with a reinforcement that's hammered in by your sewing machine. For me though, sewing machines and knitting don't mix so well intuitively (something about a machine harshly pounding into my carefully handcrafted fabric... not to mention a lamentable loss of elasticity). For this sweater, I went with the third method which utilizes crochet chains to reinforce the knitting. This method is loads of fun for those of you who like the technical stuff. You know I love it!
First and most important, we must be absolutely sure to use an animal fiber (preferably a 'sticky' one, wool as always is perfect) in a lighter weight than your sweater for the crocheting. I used KnitPicks Telemark, a sport weight wool intended for colorwork, in a mustardy yellow. I decided to use a yarn in a different color to make the process more clear visually (for both you and me) while also adding an interesting accent on the interior of the finished work. Remember that the 5-stitch stockinette area reserved for the steek (including the crochet chains) will be folded in onto the wrong side of the garment after finishing, hiding the yellow chains from view while wearing.
motor up one side
and back down the other
The completed reinforcements look something like this:
Notice how nice and neat the red line is framed by the yellow chains. We're now ready to pull out the red wool to reveal a nice tidy ladder of stitches that is just begging to be cut.
There's nothing left to do but ready the shears. Stay tuned.
¶ 10:50 AM
Comments:
~empress
http://www.nyckid.com
I watched a Philosopher's Wool video once where they knit the button band onto the uncut sweater first, then cut between the bands and tacked the cut ends down. I think that's how I would have chosen to steek a sweater such as yours.
Knowing how meticulous you are, I look forward to seeing the rest of your steeking adventures and learning what you do with those chains of crochet.
And thanks so much for leaving us all in gratuitous anticiaption of the impending "shear", ya know, let the anxiety build up a bit first... :o)
And DAMN those crochet chains look so good. CUT IT CUT IT Rah rah rah!
Denise
knitchat.com
Post a Comment
<< Home
It looks great so far! I'm looking forward to seeing it after it's cut. Great work as always :)
~empress
http://www.nyckid.com


Love the pictures - nice and clear. I'm a visual learner, so this helps more than all the words I read.
Great pictures, you actually make the steeking look fairly simple! I think the biggest fear I would have would be the psychological fear of taking scissors to my knitting. But I'm sure after a beer, I could be more inclined to try out a steek ;) It's definitely a clever way to avoid multiple body panels!
thank you for this! i've been gearing up to steek a sweater but dragging my feet because i was having a hard time wrapping my head around how the crocheted chains "fit" into the steek (but i didn't want to use my sewing machine either). these photos were perfect for helping me figure out what i need to do.
I love the contrast, and it still is very complimentary with the tweedy-ness of the fabric. On pins and needles while waiting for the cut.
It's interesting to me that you are doing it this way. I've only ever steeked Shetland wool (other than a small sampler I used to test out the different methods) and those require trimming and sewing down after the button band is knit in. So I'm surprised to hear that your crochet chains aren't temporary.
I watched a Philosopher's Wool video once where they knit the button band onto the uncut sweater first, then cut between the bands and tacked the cut ends down. I think that's how I would have chosen to steek a sweater such as yours.
Knowing how meticulous you are, I look forward to seeing the rest of your steeking adventures and learning what you do with those chains of crochet.
A fascinating procedure, Jared...one which I'd never looked into and one which opens up many possibilities for more efficient knitting and yet allows options for cardigans and such. Your Aran will be quite lovely as a cardy.
Every time I see this gorgeous, rich, dark fabric I just want to eat it up -- looks like about a gazillion calories, though. :-)
I admire you're lack of hesitation, as I'd be a little less sure of myself were I in your shoes right now! The sweater looks absolutely gorgeous though, can't wait to see it finished.
And thanks so much for leaving us all in gratuitous anticiaption of the impending "shear", ya know, let the anxiety build up a bit first... :o)
OMG this is more exciting than half the shows on right now. I can't wait to see the cutting.
And DAMN those crochet chains look so good. CUT IT CUT IT Rah rah rah!
You are so inspiring. Your work is phenomenal but beyond that your photography, writing and design talents are outstanding. I love your blog, and this project has been amazing to watch as it has unfurled itself from your needles. Keep going my friend...Dustin
You make this look soooooo easy. There should be drum rolls....This sweater is so dreamy. I hope there is a tremendous cold snap so you get to wear it for weeks before you have to hide it away from the moths for the summer.
After seeing you do this I might just have the push needed to get my steeks done.. I HAVE to do them.. being a paid test knit and all! YIKES what a way to do your first steeking project!
Denise
knitchat.com
<< Home