4.09.2007
What Now?
Now that the excitement and apprehension of cutting is over, I feel it's rather anticlimactic (cruel?) dragging this process on for you, loyal readers, any longer than I already have. I am, however, committed to a thorough documentation of this process though, so you'll get just a bit more information thrown at you before it's all over.
To be honest, I especially wanted to cover what happens after the cutting, because for me this has always been the part of steeking that was unclear. I completely understood the hows and whys of the cutting portion, but beyond that the steps to complete the route to 'finished sweater' have always been a grey area for me.
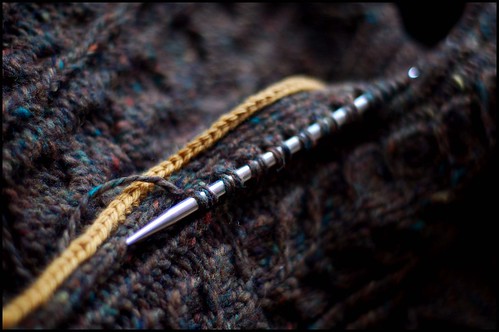
After the cutting you'll have two stockinette 'flaps' that need to be dealt with on either side of the cardigan opening. Again, the yellow wool acts as a good indicator where these flaps are on my sweater. The final step is to pick up stitches along these borders and work the button band. Depending on how many stitches you left for your steek, the width of your flaps (or "facings" as they are more correctly titled) will vary - my faccings are 3 stitches: 2 knits and 1 purl along each side of the cut. So then, we can now begin picking up the buttonband like so:

I love EZ's sensible formula for picking up stitches along a vertical edge. Instead of calculating your own stitch gauge vs. row gauge and doing all that unnecessary calculating, her trusty 2 to 3 ratio works in virtually all cases. That is, pick up 2 buttonband stitches for every 3 rows of knitting on the sweater body. This is the reason you see the stitches on my needle in pairs of two. Its a perfect ratio that is giving me a flat and even buttonband.
Once the necessary number of stitches have been picked up, knit back and forth until the bands are as wide as you need them to be, throwing buttonholes in on whatever row marks the halfway point. Simple as that.
As for the flaps/facings, they'll fold back naturally onto the wrong side of the fabric and behave nicely once all is said and done. I'll give mine a light steam with an iron to flatten them a bit more and to lessen bulk, but not much more than that is needed.
I'll probably post one more photo this week showing you how the steek is behaving once I have a more substantial amount of buttonband knitting done. All that's left is finding a few buttons that fit this beast. We're so very close to the finish!
I hope everyone had a great holiday weekend. ¶ 12:45 PM
To be honest, I especially wanted to cover what happens after the cutting, because for me this has always been the part of steeking that was unclear. I completely understood the hows and whys of the cutting portion, but beyond that the steps to complete the route to 'finished sweater' have always been a grey area for me.
After the cutting you'll have two stockinette 'flaps' that need to be dealt with on either side of the cardigan opening. Again, the yellow wool acts as a good indicator where these flaps are on my sweater. The final step is to pick up stitches along these borders and work the button band. Depending on how many stitches you left for your steek, the width of your flaps (or "facings" as they are more correctly titled) will vary - my faccings are 3 stitches: 2 knits and 1 purl along each side of the cut. So then, we can now begin picking up the buttonband like so:
I love EZ's sensible formula for picking up stitches along a vertical edge. Instead of calculating your own stitch gauge vs. row gauge and doing all that unnecessary calculating, her trusty 2 to 3 ratio works in virtually all cases. That is, pick up 2 buttonband stitches for every 3 rows of knitting on the sweater body. This is the reason you see the stitches on my needle in pairs of two. Its a perfect ratio that is giving me a flat and even buttonband.
Once the necessary number of stitches have been picked up, knit back and forth until the bands are as wide as you need them to be, throwing buttonholes in on whatever row marks the halfway point. Simple as that.
As for the flaps/facings, they'll fold back naturally onto the wrong side of the fabric and behave nicely once all is said and done. I'll give mine a light steam with an iron to flatten them a bit more and to lessen bulk, but not much more than that is needed.
I'll probably post one more photo this week showing you how the steek is behaving once I have a more substantial amount of buttonband knitting done. All that's left is finding a few buttons that fit this beast. We're so very close to the finish!
I hope everyone had a great holiday weekend. ¶ 12:45 PM
Comments:
I'm not sure which yarn I like more: the tweed or the mustard yellow.
http://knitterrooney.blogspot.com/
Post a Comment
<< Home
thanks for that little bit of info. seems like most of the tutorials out there focus on the scary part of cutting a steek (rightfully so!) but not many go into what happens after....

This has been such a helpful series of posts! Of course, it's also been great to look at the pictures of your beautiful sweater along the way. Thanks!
Thank you. Watching the cutting still gives me the willies but I loves your photos and know what happens after the cutting is great.
I've been watching your remarkable progress on this gorgeous sweater - and I just have to say thank you so much for all the information you've provided along the way. I have the pattern and instead of being apprehensive about undertaking something that looks so new and complicated, I'm actually looking forward to it, thanks to you!

not trying to throw doubt on your parentage...but are you sure you are not the son (or grandson) of EZ? you execute her ideas and patterns with such beauty and accuracy and grace. i love the tutorial, my only steeking was eunny's vest. i wish i would have known the 3:2 ration then. i'll remember the next time. great knitting, great photos, can't wait for the model shots.
thanks for that - this is definitely the portion that seems to be missing from most steek tutorials.
Great tutorial, Jared! Your photos have me sold on that yarn. AND Webs is selling it for cheap. Must. Not. Buy. More. Yarn. I think some of that tweed in a rust color will be my first post-yarn diet binge.
Thank you for the tutorial with the beautiful pictures and knitting. What a wonderful way to learn for all of us.
Thanks so much for these tutorials. As with most things though, I think I'd have to try it for myself to fully understand. To me, right now, it seems that the crochet chain is hanging on for dear life, and could pop off at any second! Scary thought. The sweater looks absolutely gorgeous by the way!
Looking good! Are you going to tack down your facings, or do they seem secure and mannerly enough to lie docily in place?
Your tutorials and photos are just superb. I have a pattern for a teddy bear sweater that requires steeking. I feel a lot less apprehensive now, after seeing your pics. Anyway, with something as small as a teddy sweater, how much apprehension can a knitter work up - a lot less than on an adult's sweater, I think!!
Thank you for documenting this process so thoroughly! It will definitely come in handy in future steek-ly endeavors.
it is nice to know it works. would there be any other buttons for the beast but some braided leather ones? well that is just my opinion. nobody asked i know.
I always thought steeking is very complicated process. Your explanation is very clear and you make steeking seems very simple and interesting process. You make me want to do some project that required steeking.
It's a treat watching this gorgeous sweater unfold. I'm glad you've decided to serialize your account. I look forward to the next installment!
Love your sweater! I'm in the middle of a cardigan that calls for garter ridge button bands but I don't think they'll look right for this yarn. What stitch do you use for your button bands and what kind of buttonhole? I'm looking for inspiration....
I have been following your tutorial closely and so far am convinced a project with steeking is high on my list. It is concisely explained and the pictures are clear to see the actual process. Thank you for the motivation!
Thank you so much for making steeking seem less frightening! I always get an unpleasant feeling in my stomach when I have to cut a knitted fabric, no matter how much crocheting has been done. But this gives me a lot of encouragement, and now I won't have a nervous breakdown over my next project because it involves steeking.
Your tutorial has been so helpful. Did you work a neck steek as Meg shows in the Wool Gathering pattern? What method do you use for determining where to place your buttons/buttonholes? I absolutely love this sweater! Thanks for sharing all your info!
Thanks for taking these wonderful pictures of the process! The one steeked sweater I've knit had knit facings to hold the cut edges in. Since you've got a crocheted chain, is that unnecessary? Are you planning on doing anything like facing the bands with ribbon?
I was sitting here staring at that last photo thinking 'gosh that looks oddly familiar'. And then I realised that I had done the exact same thing (the 2 to 3 ratio, and mine was for facing, but the little pairs of stitches are the same) on my Zimmermann sweater which is now just awaiting buttons! (which I have no idea where to find)
That cardigan is gorgeous! I only recently got over my steeking jitters. It's not as scary as I thought it would be.
I'm not sure which yarn I like more: the tweed or the mustard yellow.
Hi there - greetings from London! Just found your blog and I have been riveted by your photos and projects. Have recently discovered and fallen in love with Tweed - the sadly discontinued Rowan Yorkshire in particular. Don't think my little woolly life will ever be the same again.
http://knitterrooney.blogspot.com/
You really capture the simplicity of EZ's philosophy - it's not exactly easy, but it's very simple in concept. Thanks for the clear explanation! I haven't made a sweater yet so I'm not quite ready to jump into steeking, but when I do I'll be following this. Thanks very, very much. Also, beautiful shots. :)
This sweater is SO GORGEOUS. I really want to make one for myself, so I'm curious, how much yarn did it take? I have some 220 Superwash that is saying "Cable me!"
<< Home